Thursday 28 February 2008

Craft Prize - Blog Competition

Yippee! I have reached 2000 visitors since I started my blog back in mid December.

To
celebrate I am holding a contest.

SewDelish Craft Competition Contest 2000
The prize is the box and everything contained within it. International entries accepted and very welcome. I will also pay the postage. Entries open to male & females. This would make a great gift for a crafty person.
SewDelish Craft Competition Contest 2000

The noodle box contains lots of craft items suitable for cardmaking, scrapbooking and what ever else you can think of. Great value - Over AU$30 retail. Some items have been removed from their packaging in order to make room for more in the box! There are silk flowers, foamies, ribbons, sequins, mini bells, organza bags, stranded beads, 1m lengths of wool and more.....
How many? Well that's for you to guess!


BLOG COMPETITION RULES:

* All you need to do is guess how many items are in this box. Just leave a comment below with the number of items you think are in the box. Only one entry per person.

* The winner will be the one with the closest answer and will be announced here on the Friday 14th March.

* BONUS: Would you like to have an Extra entry to this competition?:
If you post about this contest in your blog and link to it you are permitted a total of 2 entries! This will be checked before announcing the winner.

* Don't forget to check back or subscribe to my blog's feed, just in case you are the winner.

PLEASE MAKE SURE I CAN CONTACT YOU. Email me through my profile page if you wish to remain anonymous.

* SewDelish reserves the right to disqualify persons not abiding by the rules of this competition and the judges decision is final.

Please note:
If you want post your guess anonymously please Email Me with your guess and a reference name.


Don't be fooled, I have managed to fill it with lots of crafty items, ribbons and embellishments.

SewDelish Craft Competition Contest 2000SewDelish Craft Competition Contest 2000

Have you found all the HINTS yet?


Sewdelish signature

Tuesday 26 February 2008

Easter Craft Project - Eggs and Chicks

Here the tiny eggs lay waiting.......

Easter Eggs Craft ideas for kids to make Project Nest

...Then the hatching begins!

Easter Eggs and Chick in nest Craft Project ideas for kids to makeEaster Chicks in Nest Craft Project

These Easter eggs and chicks in a nest are an easy and fun activity to do for kids and adults alike. These tiny eggs and chicks are just a mere 1 1/2" (3cm) tall.
  1. Collect some small twigs and sticks and arrange randomly in a circular brown paper-mache bowl or container. This will help give the nest it's shape.
  2. Paint some polystyrene eggs or real ones with pretty paints.
  3. While the eggs dry make some baby chicks with pom poms, tulle for the wings, cardboard for the beak and joggle eyes.
These wee chicks are waiting for tucker!
Easter Chicks in Nest Waiting for Tucker ideas for kids to make Project

Now the baby chicks are fed and ready for bed!
Easter Chicks in Nest Fed and Happy!

Click on the Holidays link at the end of this post for more Easter Holiday ideas...
Sewdelish signature

Tuesday 19 February 2008

Vintage Knitting and Crochet Patterns

Vintage Knitting and Crochet Patterns

Look what I bought today from a local thrift shop. A few vintage and not so vintage knitting and crochet patterns. Actually I bought more than this, but these are my favourites. It is so hard to find anything like these in stores today. A treasure trove of beautiful patterns.

I just adore this baby knitted pixie bonnet.

Pixie Baby Bonnet

A cute star and flower doily.
The original price of 35 cents for the
whole booklet still on the front.
I wonder how old this is!

star and flower doily

This crochet butterfly doily looks like it is tatted.

crochet butterfly doily

I want to get knitting again as soon as this sweltering hot summer is over.
Sewdelish signature

Sunday 17 February 2008

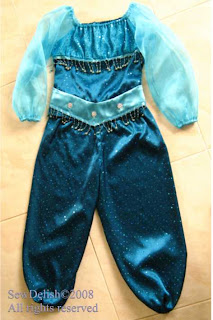
Genie or Princess Jasmine Costume

Genie Costume Close up


My DD wanted to have an I dream of Genie come Princess Jasmine costume for her birthday party a few months ago.

I went on a hunt both online and offline to find a suitable outfit.

Keywords I used:
  • Genie including Jeanie
  • Princess Jasmine
  • Arabian Princess
  • Belly dancer
  • Costume
  • Outfit
  • Dress-up
It needed to be something modest,(bare midriffs were out, thank goodness!), the colour had to be turquoise or close to it, and something suitable for cool weather. I somehow had to also incorporate each of the four different fabrics my daughter had chosen into the costume without it looking odd. I found a few costume styles that I thought Little Miss would like. WRONG. None of them were pretty enough.

Genie Costume

I then set about drafting a pattern, to DD's specifications of course! I used some pattern pieces from several different sources and altered them to create just the right outfit. Did I succeed? According to my daughter I did. Yay!!! What a relief!

The fabrics I used were plain turquoise satin, sequined teal satin, sequined turquoise stretch, and turquoise organza. The trims were some beaded ribbon and some pretty buttons. The left over trims I used to decorate DD's hair and create a genie type headband (i'm not sure of the correct term). All in all It was a success and a fun challenge for me to make.
Sewdelish signature

Friday 15 February 2008

Make SewDelish Chocolate Bars

Sewdelish Chocolate Bar Wrapper

I have been chocolate making again and I had some melted chocolate left over. I poured it into a large chocolate bar mould. After it had set I remembered about some chocolate bars we made for gifts last year, so I decided to share with you the process. If you are not up to melting chocolate or can't find a mold, then you can use a purchased bar of chocolate and decorate that.

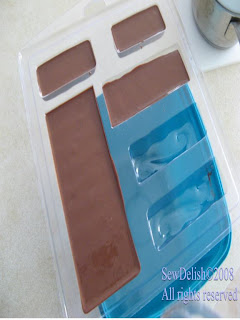
1) Melt chocolate over a double pan, then pour into mould (mold for those of you from US)

Chocolate Bar Mould Mold

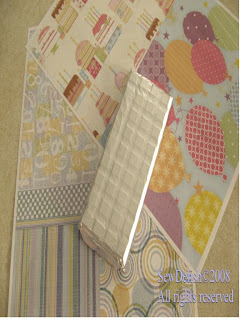
2) Allow to set while you clean up and prepare the wrapper. I downloaded some background papers from the Crafts Beautiful website . You need to be a member, but it is free to join. There are also some sites that have printable wrappers and even software you can download to make your own designs.

Download Crafts Beautiful Printable Paper

3) Once the bar is set, wrap it in some aluminum foil. This gives a professional touch and also helps with the next step.

4) Measure the height of the bar (your wrapper will be this high) and then measure the whole way around the bar and add 2-3cm(1") for overlap. Cut your paper to these measurements.

Measure Chocolate Bar

5) Centre the chocolate bar in the middle of the wrapper paper and use tape, glue or sticky dots to adhere the overlapped ends of the wrapper together. Try not to stick it to the foil. Then you will be able slide off the wrapper and turn it into a card front later.

Glue Wrapper
6) Decorate the bar with other embellishments if you wish. I used lace, ribbon and buttons for a real feminine chocolate bar. The paper and embellishments can be changed to suit the taste of the recipient (haha no pun intended).

Embellish Chocolate Bar Wrapper
Sewdelish signature

Thursday 14 February 2008

Happy Valentine's Day 2008


Today is a day to celebrate Love and Life. Whether you have a significant other or not at this time, enjoy living the life you have and loving yourself for who you truly are.

These gorgeous flowers are from my husband (Thank you honey if you read this!). We are apart this Valentine's Day due to work circumstances, so we will celebrate in a few days time.

Have a look over at Make and Takes, she has some great ideas for Valentine's Day. I particularly like these craft paper animals, and these fabulous activities to do for your loved ones too.
Sewdelish signature

Monday 11 February 2008

Antique & Vintage Singer Sewing Machine Information

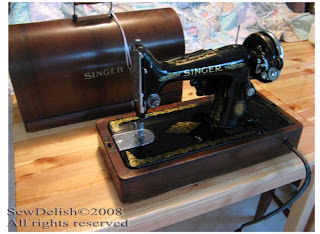
This is my 1951 Singer 99K. It is operated by a knee bar that I could get very accustomed to using. Much more control and fun too! It takes low shank attachments, which means is will fit attachments that also fit my Singer 201's and those from my puzzle box.


Singer 99K Vintage Sewing Machine

I spent quite some time researching old sewing machines, online and offline and have decided to share with you a list of links that I use. From these links you should be able to identify the model of your antique or vintage Singer sewing machine, date it and also find out the attachments it will take. There are also free manuals on a few of them for you to download. Which provide loads of information on the machines themselves.

If you have a link you would like to add, please leave a comment and I will add it to the list once I have checked it out.

( have updated these links 9th January 2012. Some have expired, but I was able to track some of them down through the web archive. I have left the old links in should they become available at a later date)

Sewing Machine Photo ID Walkthrough Very useful**

Dating Antique and Vintage Singer Sewing Machines 
For detailed manufacturing dates and model numbers

Singer Sewing Machine Serial Numbers
 This information in no longer very detailed and does not show models numbers.

Singer Sewing Machine Company From ISMACS - machines, cabinets, manuals & attachments


ISMACS International Free manuals and lots of information**

How Much is Your Machine Worth?

Treadle On

Needlebar Need to become a member to read messages

Seized Machine Treatment (Information No longer Available)

Sewalot

Antique and Vintage Sewing Machine Virtual Museum

Featherweight Information


Free Download for Singer Manuals 15, 28 and 66

Sewitgoes Sewing Machine Collector's Gallery New Link
(Old Link Sewing Machine Collector's Gallery)

Part and Attachments for Singer Sewing Machines - New Link
(Old link Parts/Attachments information)


Featherweight 221 Factory

Yahoo Singer Attachments Group - Need to be a member to view messages

Yahoo Vintage Singers Group
- Need to be a member to view messages

Sewdelish signature

Thursday 7 February 2008

What Do You Think Of My New Look?

Just a quick post as I have been a little busy today. I have been learning a little about HTML since I began this blog and have been playing. I am not too sure about the new colours though. I would love to know what you think and if there are things I have missed changing.

I think I have been used to looking at the spots too long and become accustomed to them, so I am unsure of this new look.

This is what my blog looked like before the changes
SewDelish Blog with Dots Template

I found some great information, that is easy to follow from Blogger Buster on changing templates easily and if I can follow these instructions I am sure anybody can.


Sewdelish signature

Photo Editing Competition

Photo Projectz is having a photo editing competition, so I thought I would have a go. My entry is a fairly simple one, however I like how it seems to have a completely different meaning now.

All I did was to copy the photo and make a mirror image. I then added some text and voila!
What do you think?

Photo edit crossroads

I feel like I'm standing at the crossroads of life.

Sewdelish signature

Wednesday 6 February 2008

The Big List of Sewing Blogs

The Big List of Sewing Blogs

I'm listed on The Big List of Sewing Blogs by Suzical. She has a huge collection of links to some great blogs and checks each one out before listing it. I keep finding myself going there just to check out some new additions and to see what fellow stitchers are up to.

Today I discovered a gorgeous Valentine's Day love handbag made by Perfect Little Purses. She has it listed on ETSY. I would snatch it up in an instant, but red just isn't a color that suits me. Oh well never mind.

I also discovered tutorials for Magic Boxes by Life s Lou and her exploding boxes through this site Today's Creative Blog.

It is so easy to lose oneself looking around the web. I sometimes forget where I began looking. If you would like to see some of my sewing projects they are here. I have a number of tutorials and lots more to come. You can pop back to check or subscribe to my blog by clicking on the subscribe button up the top.
Sewdelish signature

Tuesday 5 February 2008

Cleaning Old Antique & Vintage Sewing Machines - Updated Previous Post


For those of you who have been waiting, I have uploaded some more photos to my Cleaning Old Antique and Vintage Sewing Machines Tutorial. I hope this makes the cleaning method a little easier to follow.
Antique Singer 66-1 Treadle Back Handwheel
Sewdelish signature

Sunday 3 February 2008

Getting Ready for School - Sewing

I have just saved myself about $20 making these easy sewing projects for my daughter for school. For those of you who have read my post about my "action plan" , I did not need to purchase anything for these projects. Everything came from my supplies, right down to the smallest details. So technically speaking they didn't cost me anything! Well except for when I purchased them in the first place! It sounds good though, don't you think?

A gorgeous floral fairy library bag and a personalized turquoise gingham art smock.Art Smock and Library Bag
Fairy Library Bag


The library bag is a basic tote bag pattern that I designed based on the size of largest kids book I could find. It is also reinforced with extra rows of stitching along the base and on the handles to make it withstand the weight of a few books.

The pattern for the art smock is from a toddlers smock that I have made larger and longer. Art smocks are normally fairly boring looking so I wanted to make this one look a bit more "cool". I used some Jones Tones Metallic Ultra Paint to write my daughters name on the front and embellished it with a couple of craft rhinestones. This paint can be used on almost anything and is machine washable too! I think I would have loved to have had an art smock like this one when I was a kid!
Jones Tones Metallic Paint
(Added 5 Feb 2008)
I surprised my daughter with the art smock on the first morning of school. The reaction was "It's so much better than the shop ones, do I really have to use it? I don't want it to get dirty" What do I say to that? What a compliment!
Sewdelish signature

Printable Stickers and Labels for School

I went on a hunt on the web to find some stickers and labels for school and found stickers and charts.com where you can download heaps of pages to make into stickers. I printed off a few pages onto some ordinary A4 paper, and cut them out so we could feed them through the Xyron Sticker Machine.
Printable Stickers and Labels

I then went on a search for printable book labels and pencil name tags, for free download of course, but no such luck. So I made some myself, unfortunately no pics to show you, but I will tell you my secrets!

For the book labels, I used publisher to make a business card, that prints multiple cards on the one sheet. I deleted all the extra details like address and phone numbers and just added the name, school, class No and year. Then I changed the background design and colours to suit a child and presto! Print, cut and feed through the sticker machine before placing on books, lunch books or whatever. To make the stickers last I like to place some clear packing tape over the top to protect them.

Now the pencil name tags are more involved, so I may produce a tutorial for this at some stage later. However the basics are: use Microsoft excel or a similar spreadsheet program to make lots of narrow rows, that are long enough to fit the name. Insert the name and a small graphic font and print. All you need to do then is cut them out and apply them with some clear cellotape. I printed mine in several different colours rather than just plain black. Pencil tags are great to put on anything, not just pencils, they can be used on glue sticks, rulers and even scissors.

Almost ready for school now!
Sewdelish signature

LinkWithin

Related Posts Plugin for WordPress, Blogger...