Monday 25 May 2009

Button Crafting - Is it a Necklace, a Belt or a Bracelet?

Make Buttons Jewelery Shabby Chic Button Wire Necklace Bracelet Belt Jewellery

If you have been following my blog you will know I have just a few(wink wink) buttons! So I decided to actually use some of my buttons rather than just play with them LOL! I also entered this into a challenge on the Crafts Beautiful forum for the launch of the new Sew magazine.

Make Buttons Jewelery Shabby Chic Button Wire Necklace Bracelet Belt Jewellery

I started out with the intention of making a button belt and then once it was finished I thought it would make a gorgeous button necklace when combined with a handcrafted pearl necklace.

Make Buttons Jewelery Shabby Chic Button Wire Necklace Bracelet Belt Jewellery

It also looks funky as wrap around bracelet! It might even make a really interesting headband as well but I think I prefer it as a shabby chic style necklace.

Make Buttons Jewelery Shabby Chic Button Wire Necklace Bracelet Belt Jewellery

It took me about 2 hours to design and create. All the buttons are threaded onto one really long piece of wire folded in half. No two buttons the same with 61 used in total. It took me ages to go through my buttons to find all the ones in just the right colours with each one being different. I made a loop closure as a feature at one end with pearl beads. I varied how I wired the buttons too. Some I threaded the wire through simply, some twisted, or criss-crossed, some over and under opposite ways and a few have been thread through backwards and the wire twisted into a coil on the top.

Make Buttons Jewelery Shabby Chic Button Wire Necklace Bracelet Belt Jewellery

I am not generally one for buttons on jewellery but this one I am really happy with. I would love to hear what you think.

Sewdelish signature

Thursday 21 May 2009

Bind-it-all Special Secrets Notebook

Chinese brocade fabric notebook make Bind-it-allAlign Center

Here is a notebook that I made for my DD. Her favourite colour is turquoise. This is a special book for her to write all the things she wants to as she grows from a young girl into a young lady.

The notebook is covered in chinese brocade fabric. The beads are what was left from making her Princess Jasmine costume a couple of years ago and they hold a special place in her heart as it was a very memorable occasion for her. I lined the inside of the covers in scrapbooking paper and also covered a pencil to match. I used my bind-it-all and then I tied a length of turquoise ribbon to the wires on the inside for my daughter to use as a bookmark.

Chinese brocade fabric notebook make Bind-it-all
Sewdelish signature

Saturday 16 May 2009

Mother's Day Cards using Twisted Paper Flowers 2009

mother's day card cricut mothers blue flower vellum twisted paper flowers cards

mother's day card cricut mothers blue flower vellum twisted paper flowers cards

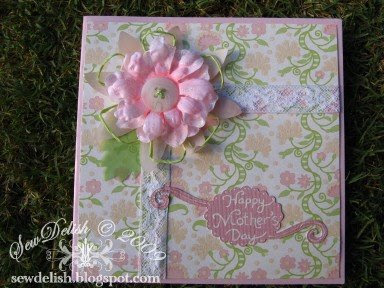
I can now show you the cards I made for Mother's Day. They are very feminine and I love how they turned out. They were relatively quick to make and our Mums loved them.

mother's day card cricut mothers blue flower vellum twisted paper flowers cards

On both of the cards I used twisted paper flowers which I made on my daisy wheel. A daisy wheel is a small knitting loom use for making wool flowers. They only take a couple of minutes each to make. I have been making a stash of them in different colours whilst watching TV. I combined the twisted paper flowers with vellum flowers and glittered silk flowers as well as a button from my huge button collection that you may remember from my previous post! Two down and many many more to go! LOL

mother's day card cricut mothers blue flower vellum twisted paper flowers cards

The Mother's Day sentiment I wrote in gel pen on a scalloped tag I cut using the Storybook cartridge and my Cricut Expression. The swirls looked too much on the blue card so I removed them and used them as part of the flower.

mother's day card cricut mothers blue flower vellum twisted paper flowers cards

I also made a very tiny dent in my ribbon and lace collection too using some on the cards. The longest piece was only 16cm(6 & 1/2") long. Oh well I guess every little bit helps!

I hope you all had a wonderful Mother's Day including those of you with furkids!
As always I love to read your comments and try to visit your blog in return when I can. Have a great weekend.
Sewdelish signature

Friday 8 May 2009

Buttons, Buttons, Buttons! Sorting, Organizing and Storage

organise Buttons storage sort sewing craft organize how store button tutorial

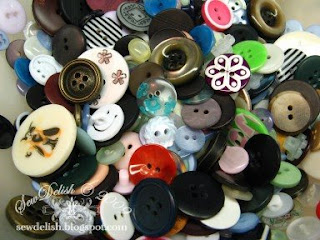
Well as I have mentioned previously I have been busy sorting and organizing in my crafts and sewing room. I have waaaayyyy too many buttons than I will probably ever use, but at least I can always find something suitable for whatever I am working on!

The best way to organise your buttons is to work out what method you use to decide what ones you would like for your project. I usually decide on a colour first and then either choose a plain or fancy buttons before I make my final decision. It may not be the right method for everyone but it works for me.
Special buttons that I know I will never want to use go in a special tin with buttons in handed down to me from my Grandmother.

Sew here we go.............

HOW TO ORGANIZE BUTTONS:

organise Buttons storage sort sewing craft organize how store button tutorial

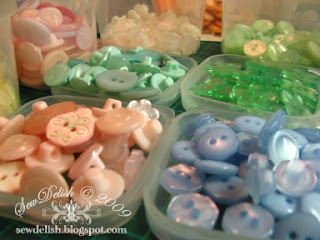
1) Put on some music or watch TV. Sit near a window in daylight. This will help you tell the difference between similar colours - black and navy as well as lemon and cream. Some look deceptively similar in low or even fluorescent light.
2) Take one pile of mixed buttons, have a play and oohhhh and aaahhhhh! Pick them up and let them run through your fingers!
3) Set out lots of small containers, jars, lids or even ziplock bags. Two for each colour group you want to use. One for the plain buttons and one for the fancy buttons.
4) Sort the buttons. I have loads of brown, blue and green buttons so I sort those further into lights and darks. Some of the buttons are also sorted into sets of the same to make them easier to find later.
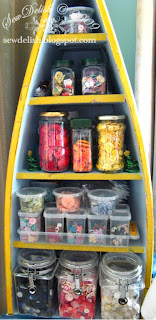
5) Place your sorted buttons where you can reach them easily and quickly when you need them. Buttons I use regularly I store in containers on a shelf and ones I use less often I store in ziplock bags and place in a box nearby.

organise Buttons storage sort sewing craft organize how store button tutorial


I would love to hear how you sort store your buttons. If you have any pictures, place a link in the comments section so I can come and check it out.
Sewdelish signature

LinkWithin

Related Posts Plugin for WordPress, Blogger...