I thought I would share with you the information I used to learn how to make a watermark for my photos.
It is here and actually uses photodraw, but the instructions are very easy to follow so you can adapt them to suit what ever program you have.
I usually make the watermark using fancy fonts and I save it separately to just copy and paste each time I want to add a watermark to a photo. It saves having to create a watermark each time. My current watermark is made using a free fonts downloaded from the web. One of them is a floral font. I just add text boxes with the individual images/font letter and arrange them until I am happy. I then group them as one image and adjust how transparent it is before saving as my watermark. Make sure the colour will show up on your photos. You don't want it too light or too dark.
Here is a site that explains how to add a watermark to your photos using word or photoshop,
and here is how to do one in a flikr account,
Lastly here is a video for visual learners.
Adding a watermark will not stop someone from copying your photos and claiming them as their own, (as has happened to me) but it will show who they belong to and hopefully prevent it. If you add your blog name too this will help.
I hope the links above help you add a watermark to your photos. If you find a really easy tutorial you would like to share I will add the link here. Just leave a comment below for me to check it out.
Have fun creating!
SewDelish
xx
Thursday, 28 August 2008
Wednesday, 27 August 2008
Some Sewing - How to Make a Shower Cap - Tutorial
I would love to see a photo if you make a shower cap using my instructions. Please provide a link to this post if you wish to share these instructions with others.
Materials required:
Fabric (I use satin or lightweight cotton so it dries quickly)
Thin plastic (disposable tablecloths or plastic shower curtains are great for this)
Satin binding
Cotton binding
Narrow elastic
Thread to match
Biro for marking on the plastic
Straight stitch sewing machine (yes you can even make this on a treadle!)
Directions:
1) Make your pattern for the shower cap using fairly large paper. You need to cut a circle approximately 55cm in diameter. If you have really long hair or are likely to have rollers under it I would recommend 60-65cm. For children 50cm is usually sufficient.
2) Cut 1 piece in your chosen fabric and one piece in plastic for the waterproof lining
3) Pin around the very edge with wrong sides together. This keeps everything in place as you sew. Satin and plastic are very slippery when you are trying to sew the two together. Keep the pins right to the very edge so any pinholes created in the plastic will be hidden under the binding when you sew it on. Baste all the way around.
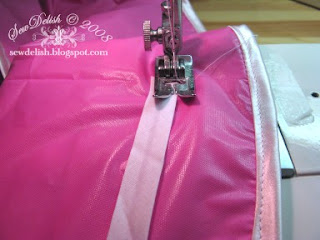
4) Open out the satin binding and sew it to the inside(plastic side) of the showercap as in the picture below. Fold over the end before you begin to stitch so you will have a neat finish.
5) Once you have stitched all the way around, fold the rest of the binding over the seam and over to the right side of the shower cap and stitch in place from the fabric side. This step covers the previous stitching lines. Sometimes I add lace at this step too.
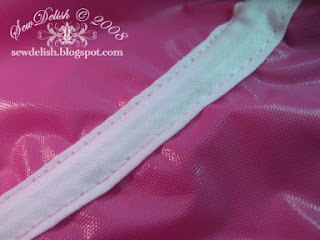
6) With the plastic side facing up on the shower cap, measure and mark 5cm (2") in from the edge all the way around. This is where you will make casing for the elastic. Fold the end of the cotton binding over then sew the binding along the edge onto the line you marked earlier. DO NOT overlap or sew over the ends as you will be threading elastic through there shortly. Refer to pics below. Repeat sewing along the other edge of the binding to create two stitched lines. Tie off any loose threads.
7) Thread the elastic though the casing. I usually use a small safety pin or an elastic bodkin. Use enough elastic to make it comfortable and not too tight. Secure the ends of the elastic either by sewing or tying them in a knot. Hide the ends in the casing using a pair of tweezers to push them in. Decorate with the outside of your new shower cap with a satin bow or a fancy button if desired.
These showercaps can be washed by hand in lukewarm water or in a cold wash in the washing machine on a gentle cycle.
Here is a shower cap and a couple of make-up bags I made using a thrifted pillowcase that was made from Breast Cancer Awareness Fabric.

Tuesday, 26 August 2008
Plagarism and Blogging
To those of you that subscribe to my blog or are regular readers, there will be a few changes happening in the near future. I have had to change the feeds back to partial feeds again due to some of my blog content being stolen.
This person has directly copied one of my blog posts including the watermarked images and pasted it into their blog as if it were their own. They have not provided a link back to my blog and also what is worse, they are making money from my work using Google Ad sense.
I will not be providing the link to the offending blog because I feel they do not deserve the link from me, visitors nor money raised from any ad clicks. There are a number of posts on the offending blog that I believe to be stolen from other bloggers and again no credit has been given to the original authors. The whole blog looks like it was created in a few days just to make money from ad clicks.
I am flattered that someone would love to share my work, but to give me no credit or a link back and completely plagarise everything is more than frustrating. The post copied is not the issue here, just the fact that it was copied entirely to make money from and without permission sought nor credit given. I have now reported the incident to Ad sense as the blogger is not only breeching copyright laws, but also Google Ad sense policies.
If you are a blogger yourself I would recommend putting a watermark or name and copyright information on all of your photos before you upload them to the internet. That way there is no dispute as to who they belong to.
I love to inspire creativity in others, just as I find inspiration from the work of others, but credit needs to be given where it is due. I regret having to make changes, but I feel it is necessary and hope it will not prevent your enjoyment of visiting.

Saturday, 16 August 2008
Awards!
I have been given this award by 3 lovely ladies.
Natalie, Lauren and CarolineThank you so much ladies.
I have tried to pass them onto some different bloggers this time.
The rules of the award are:
1. The winner can put the logo on her blog.
2. Link the person you received your award from.
3. Nominate at least 7 other blogs.
4. Put links of those blogs on yours.
5. Leave a message on the blogs of the girls you’ve nominated
So here goes:
http://www.scrapandstuff.canalblog.com/
http://kraftykitn.blogspot.com/
http://buttonsforbrains.blogspot.com/

Subscribe to:
Posts (Atom)


