This is my Singer 201K from the 1950’s. When I bought it, it had only
been used as a hall table for many years and the machine itself was never used
by the owner. The table was in really good condition and clearly had been
polished regularly. The machine however needed cleaning and the power lead,
pictured below, needed replacing. Thankfully after a good clean and service I
ended up with a great working machine. Here I will share with you how I clean
my machines, no matter how old they are.
Things
you will need:
- Newspaper - to sit your
machine on and protect the surface underneath
- Rags - lots for cleaning and
polishing
- Paper towels to sit cleaned
items to dry
- Toothbrush or paintbrush -
to clean stubborn areas
- Cotton tips
- Vacuum cleaner with a Computer
attachment (it allows you to reach small areas easily)
- Kerosene
- brass or silver cleaner
- good quality sewing machine
oil
- gloves to protect your hands
from the dirt and chemicals
- notepad and pencil or
digital camera to make notes as you take things apart
How I Clean My Old Machines:
Remember
to only do one section of your machine
at a time to make it easier to put back together!!!It can
help to take photos or takes notes as you work. If you have a manual for your
machine keep it handy, just in case you need to refer to it
Take note of where the parts belong. Then remove
all the shiny parts and clean with brass or silver cleaner. I was told by
my local sewing machine repairer that brass cleaner is much softer on the
metal parts and will cause less wear in the long term. If find it safer to
remove the needle from the machine during the cleaning process.
Remove lint from the bobbin
case and under the machine. I use my vacuum cleaner with a tiny computer nozzle
attached to make it easier. Some people use canned air but I don’t like
the dust blowing around getting into places that may cause damage later. I
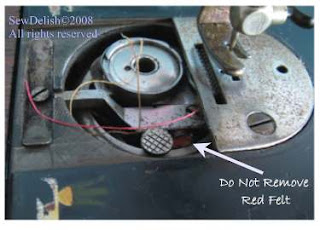
prefer to get rid of it completely with the vacuum. NOTE: If you find something that looks like a piece
of red felt, LEAVE IT THERE! It is felt and helps to lubricate things.
It is meant to be kept oiled. Do not take it out. The model in the photo
below is a Singer 66-1  Clean areas under the faceplate and underneath
with some kerosene on a rag, paintbrush or cotton tip. This is also
safe to use on decals but I would be careful on worn areas anyway to help
preserve them. Don’t forget the feed teeth. Wipe away any excess.
Oil the machine on all the moving parts where
metal touches metal. It also helps to refer to the manual if you
have one for your model. You can find out the model number of your machine
at ISMACS using the serial number which is found on the front base plate
of the machine. This site will also tell you approximately when your
machine was manufactured.
Replace all removed parts. Worn bobbin winder
tires and belts should be replaced with new ones, especially if you intend
to use the machine. Keep the originals.
Once you have finished cleaning, the whole
machine can then be given a polish with some machine oil or a wax
and polish with a gentle car wax. I just used sewing machine oil as
I didn't have any car polish. Just be careful over the decals. Do not
allow any oil to come into contact with the rubber bobbin winder tyre or
belt. This will cause them to perish quicker, and will make them slip if
you intend to use the machine.
Any gears on the machine will need to be
greased. I use grease from my local sewing machine repair shop. Follow
your manual for application points as grease should NEVER be used like
sewing machine oil and the oil should NEVER be used in place of grease
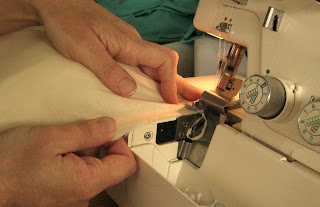
Inspect any electrical wires and cords if your
machine has them. Damaged ones should be repaired or replaced by a
licensed electrician. A power cord that looks like this really needs
replacing, even if it does work! This one has perished from being in the
same coiled up position for years. I usually give this job to an
electrician.
  Polish the wooden table or bentwood cover if
you have one with a quality wood polish. I used marveer.
If you find this helpful or something is not quite clear, please feel free to leave a comment or email me.


