Here is a gorgeous dress I have just finished sewing for my little one for Christmas and could not wait to share with you. I stitched a rolled hem wth my overlocker on all the hems and added a little ric rac embellishment. This is a size one and it seems very long, but at least my little girl will be able to get lots of wear from it.
It is from Simplicity 5695 and I love how many different looks you can get with the one pattern. This is going to be a definite favourite. There are only 4 pattern pieces needed to make this Christmas dress (view C) and it is so quick to make up.
Friday, 2 December 2011
Saturday, 6 August 2011
Wallet Money Cards
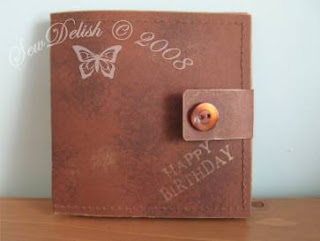
Here are a few money cards I made a while ago. For some reason I forgot to publish the post and pics so here they are. Oops just realised a couple have the wrong watermark too!
Anyway the first wallet card was made using the template from Valita's Designs. Instead of false stitching though I did real stitching on my sewing machine which was so much easier and quicker to do. It also has the benefit of looking more realistic too. I used cling film to stamp various inks onto brown card to give it the textured and worn appearance of old leather.
The wallet closures are made from sticky backed velcro and coloured to match the card with acid free permanent markers.
I have since modified a few things on the template so I can make use of only one A4 sheet of card. My template also has a double closure that holds the card open and still looks like a closed wallet at the same time. These wallet cards were brighter as they were intended for children.
The recipients of these loved them so much they ended up taking the wallet shopping with them just like a real one!

Thursday, 23 June 2011
New Blog Look Vintage Style
I have been trying to update the look of my blog for a while now and finally manage to find something I like. Vintage Made for You has so many gorgeous designs and best of all they are free. If you have been viewing my blog whilst have been testing out the different looks, my apologies, it must have looked like there was a gremlin or two here!
If you don't remember what my blog looked like before the new background was installed here you go...
I am really loving the new design and I am now thinking of changing my header too, so I am working on that to see what I can come up with.
If you don't remember what my blog looked like before the new background was installed here you go...
After
Before
I am really loving the new design and I am now thinking of changing my header too, so I am working on that to see what I can come up with.

Friday, 3 June 2011
Freebie - Printable Cutting Guide for Cricuts with Personality
Many of us with cricut machines know there are slight differences with the cutting settings on them as they all seem to have their own personalities! Mine can sometimes be different when I insert a new blade too! Sooooo......
I designed this sheet to go in my cricut handbook file to keep track of the different cutting settings I use on my cricut. I always have my handbook file out when I am cutting so it is only natural I keep my cutting guide sheet with it.
I have left room for a small sample of the material to be glued to the page and allowed for some short notes too. This way if you have similar paper/card but a different brand you could use the settings as a starting point without wasting valuable paper making test cuts. In the notes is where I write which blade housing I have used and if the settings have left marks in the mat or torn the material so I can adjust the settings accordingly next time. I also make notes if the cuts are simple or detailed on mine.
Click on the image above or the link below to access the free printable pdf download and leave a comment to let me know what you think. It prints on an A4 page. You can download and print as many pages as you like. PERSONAL USE ONLY THOUGH PLEASE (unless permission obtained first)
If you want to share this with others please provide them a link to this post so they can visit directly.
My Cricut Cutting Settings by Sewdelish

Wednesday, 1 June 2011
Yoga Baby!
I just had to share this photo. Our little one is starting to get around and this is something she loves to do.
She looks like she is trying to do the downward dog so we call her our yoga baby!
Have a great day and soon I will be able to show you photos of my newly renovated old sewing machine. I just need to fix up the decals and then I will be finished. So remember to come back so you can see it!
She looks like she is trying to do the downward dog so we call her our yoga baby!
Have a great day and soon I will be able to show you photos of my newly renovated old sewing machine. I just need to fix up the decals and then I will be finished. So remember to come back so you can see it!

Thursday, 26 May 2011
Another Mother's Day Card using Cricut Lacy Labels and Prima Flowers
Here is another Mother's Day card I meant to share with you on my last post.
It is also made with the Cricut Lacy Labels cartridge, Martha Stewart Seasonal Cake Art and a bunch of prima flowers.
I used my pink Amy Chomas gel pen holder to draw around the labels then the sentiment before cutting them out. I sponged brilliance pink ink around the edges of the labels and added lace and some bling.

Wednesday, 18 May 2011
Pretty Mother's Day Card with Cricut Lacy Labels and Prima Flowers
Here is a card I made for Mother's Day and could not share with you earlier. It is created with the Cricut Lacy Labels cartridge, Martha Stewart Seasonal Cake Art and a bunch of prima flowers.
I used my pink Amy Chomas gel pen holder for the first time to draw around the labels and sentiment before I cut them out. I also lightly sponged brilliance pink ink around the edges of the labels and added some bling to make it a little bit more special. (Click the photos for a closer view)
I love how this card had turned out and I hope it gives you some inspiration. If you are interesed in the cut file, just email me with Mother's Day cut file in the subject line.

Tuesday, 3 May 2011
I've Been Sewing some Cute Flannelette Baby Bibs
I made these cute baby bibs a little while ago from some leftover flannelette I had. They all have a patterned side and a plain side so that I can use them either way then they also coordinate with more outfits!
They are so quick and easy to make and a great project even for a sewing beginner. The only stitch involved is straight stitch so if you have and antique or vintage sewing machine that only sews a straight this is another project you can make easily.
I drew a simple bib shape onto some paper and used that as my pattern. The ties are made from bias binding that I already had on hand so cost was minimal.

Friday, 29 April 2011
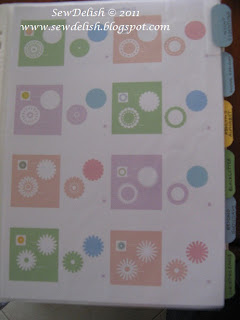
Organising My Cricut Cartridge Handbooks
I have had so many enquiries on this post so have made a tutorial on how I print and organise my cartridge handbooks. You can find it here.

I have been arranging my printed Cricut cartridge handbooks so I can lay my hand on each one quickly and easily.
All the handbooks are placed in clear pockets, sorted into alphabetical order and then labelled. Each tab is coloured according to whether the cartridge is a font, shapes or lites/seasonal cartridge.
Orange/peach tabs are for font cartridges
Blue for shapes cartridges
Green for lite and seasonal cartridges
The tab shape is from Tags, bags, boxes and more cut at 1 and 3/4 inches. It is the mirror tab shape on page 34 of the handbook.
If you label the tabs like on my photo here, then tape or glue to the first page of your handbook, you will be able to see the names from both sides as you browse through your file.

Easter Cards using Penny Black Bunny Bath Stamp

I made these cute cards for Easter and just had to share them with you. Apart from the colouring and waiting for the stickles to dry they were quick to make.
The stamp is Penny Black Bunny Bath, it's an old one but new to me. I love this stamp so much I had to make several cards the same but different. The border is decorated with ice stickles in a swirl pattern. The stamp is coloured using a water brush and markers.

Friday, 22 April 2011
Very Feminine Card
Here is a real girly card made for a birthday for someone in the family a while ago. I normally try and make cards ahead of time so they are ready to use when I need them. This one was no exception hence the date on the watermark!
The centre flower is made using a bottle top flattened in my cuttlebug, then topped with a punched paper circle and ribbon flower.
I used stickles on the background paper and dimensional pearl paint dots on the lace.
The frame was given to me in a RAK (Random Act of Kindness). It was dry embossed with the swiss dots folder in the cuttlebug then covered in glossy accents.

Friday, 18 February 2011
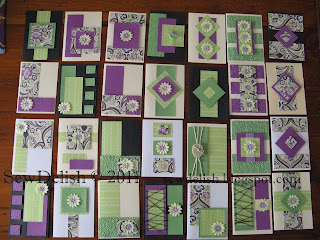
28 Cards with 4 Sheets of paper and my Cricut
I created a one sheet wonder file on Design Studio using Plantin Schoolbook based on the template by Scrapoholic on the Cricut messageboard and cut 2 pieces of patterned cardstock and 2 bazzil card. Some of the cutting lines are out of the boundary but they are easily cut with a pair of scissors. Then I made a whopping 28 cards with all the cuts!
I tried to make many of the cards both normal and tent fold so they would be more versatile and I left room on most of the cards to stamp a sentiment later as the cards are needed. I used a couple of the layouts from Scrapoholic, but most of these ended up my own design so I could make as many cards as possible. I also embossed some of the plain card and only used 2 packets of flowers to keep the cost down.
Feel free to use the cut files and scraplift card layouts for your personal use only. Link photos of your cards here so I can see them.
Click here for the Design Studio File
Click here for the Gypsy File

Subscribe to:
Comments (Atom)


