Showing posts with label Antiique/ Vintage Singer Sewing Machines. Show all posts

Sunday, 22 January 2012

How To Clean Old Antique and Vintage Sewing Machines


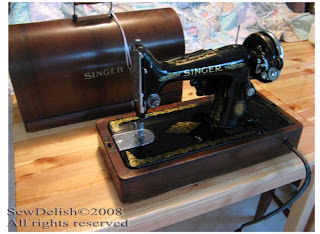
This is my Singer 201K from the 1950’s. When I bought it, it had only been used as a hall table for many years and the machine itself was never used by the owner. The table was in really good condition and clearly had been polished regularly. The machine however needed cleaning and the power lead, pictured below, needed replacing. Thankfully after a good clean and service I ended up with a great working machine. This tutorial came about because I could not find much information on cleaning these old sewing machines. Here I will share with you how I clean my machines, no matter how old they are.

Things you will need:
  • Newspaper - to sit your machine on and protect the surface underneath
  • Rags - lots for cleaning and polishing
  • Paper towels to sit cleaned items to dry
  • Toothbrush or paintbrush - to clean stubborn areas
  • Cotton tips
  • Vacuum cleaner with a Computer attachment (it allows you to reach small areas easily)
  • Kerosene
  • brass or silver cleaner
  • good quality sewing machine oil
  • gloves to protect your hands from the dirt and chemicals
  • notepad and pencil or digital camera to make notes as you take things apart
How I Clean My Old Machines:
Remember to only do one section of your machine at a time to make it easier to put back together!!!It can help to take photos or takes notes as you work. If you have a manual for your machine keep it handy, just in case you need to refer to it.

Computer Attachment for Cleaning Sewing Machines
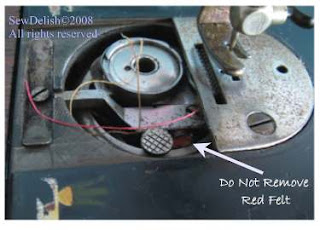
Do Not Remove any Red Felt you find
  1. Remove the needle from the machine as this makes cleaning easier and safer. Remove and the shiny parts and clean with brass or silver cleaner. I was told by my local sewing machine repairer that brass cleaner is much softer on the metal parts and will cause less scratches and wear in the long term. 
  2. Remove lint from the bobbin case and under the machine. I use my vacuum cleaner with a tiny computer nozzle attached to make it easier. Some people use canned air but I don’t like the dust blowing around getting into places that may cause damage later. I prefer to get rid of it completely with the vacuum. NOTE: If you find something that looks like a piece of red felt, LEAVE IT THERE! It is felt and helps to lubricate things. It is meant to be kept oiled. Do not take it out. The model in the photo below is a Singer 66-1 
  3. Clean areas under the faceplate and underneath with some kerosene on a rag, paintbrush or cotton tip. This is also safe to use on decals but I would be careful on worn areas anyway to help preserve them. Don’t forget the feed teeth. Wipe away any excess. 
  4. Oil the machine on all the moving parts where metal touches metal. It also helps to refer to the manual if you have one for your model. You can find out the model number of your machine at ISMACS using the serial number which is found on the front base plate of the machine. This site will also tell you approximately when your machine was manufactured. 
  5. Replace all removed parts. Worn bobbin winder tires and belts should be replaced with new ones, especially if you intend to use the machine. Keep the originals. 
  6. Once you have finished cleaning, the whole machine can then be given a polish with some machine oil or a wax and polish with a gentle car wax. I just used sewing machine oil as I didn't have any car polish. Just be careful over the decals. Do not allow any oil to come into contact with the rubber bobbin winder tyre or belt. This will cause them to perish quicker, and will make them slip if you intend to use the machine. 
  7. Any gears on the machine will need to be greased. I use grease from my local sewing machine repair shop. Follow your manual for application points as grease should NEVER be used like sewing machine oil and the oil should NEVER be used in place of grease 
  8. Inspect any electrical wires and cords if your machine has them. Damaged ones should be repaired or replaced by a licensed electrician. A power cord that looks like this really needs replacing, even if it does work! This one has perished from being in the same coiled up position for years. I usually give this job to an electrician. 
  9. Polish the wooden table or bentwood cover if you have one with a quality wood polish. I used marveer.

Perished And Damaged Cords Need Replacing or Fixing


More information can be found here my post on Helpful Links on Antique and Vintage Sewing Machines,  ISMACS  and Treadleon.

If you find this information useful or something is not quite clear, please feel free to leave a comment.


***My Original blog post on this topic has been now been restored and can be found here. *****
Sewdelish signature

Monday, 9 January 2012

Dating Vintage Featherweights and Other Antique Singer Sewing Machines

The Singer website has removed the detailedr records regarding manufacturing dates for their vintage and antique sewing machines. Fortunately much of this information has been preserved by others and it is now being shared over at ISMACS.

Just locate the serial number on your sewing machine, follow the link below and find your serial number to establish it's approximate date of manufacture.

Dating Singer Sewing Machines


Sewdelish signature

Tuesday, 3 May 2011

I've Been Sewing some Cute Flannelette Baby Bibs

Sewing cute quick make baby bibs flannelette and binding

I made these cute baby bibs a little while ago from some leftover flannelette I had. They all have a patterned side and a plain side so that I can use them either way then they also coordinate with more outfits!

They are so quick and easy to make and a great project even for a sewing beginner. The only stitch involved is straight stitch so if you have and antique or vintage sewing machine that only sews a straight this is another project you can make easily.

I drew a simple bib shape onto some paper and used that as my pattern. The ties are made from bias binding that I already had on hand so cost was minimal.
Sewdelish signature

Monday, 11 February 2008

Antique & Vintage Singer Sewing Machine Information

This is my 1951 Singer 99K. It is operated by a knee bar that I could get very accustomed to using. Much more control and fun too! It takes low shank attachments, which means is will fit attachments that also fit my Singer 201's and those from my puzzle box.


Singer 99K Vintage Sewing Machine

I spent quite some time researching old sewing machines, online and offline and have decided to share with you a list of links that I use. From these links you should be able to identify the model of your antique or vintage Singer sewing machine, date it and also find out the attachments it will take. There are also free manuals on a few of them for you to download. Which provide loads of information on the machines themselves.

If you have a link you would like to add, please leave a comment and I will add it to the list once I have checked it out.

( have updated these links 9th January 2012. Some have expired, but I was able to track some of them down through the web archive. I have left the old links in should they become available at a later date)

Sewing Machine Photo ID Walkthrough Very useful**

Dating Antique and Vintage Singer Sewing Machines 
For detailed manufacturing dates and model numbers

Singer Sewing Machine Serial Numbers
 This information in no longer very detailed and does not show models numbers.

Singer Sewing Machine Company From ISMACS - machines, cabinets, manuals & attachments


ISMACS International Free manuals and lots of information**

How Much is Your Machine Worth?

Treadle On

Needlebar Need to become a member to read messages

Seized Machine Treatment (Information No longer Available)

Sewalot

Antique and Vintage Sewing Machine Virtual Museum

Featherweight Information


Free Download for Singer Manuals 15, 28 and 66

Sewitgoes Sewing Machine Collector's Gallery New Link
(Old Link Sewing Machine Collector's Gallery)

Part and Attachments for Singer Sewing Machines - New Link
(Old link Parts/Attachments information)


Featherweight 221 Factory

Yahoo Singer Attachments Group - Need to be a member to view messages

Yahoo Vintage Singers Group
- Need to be a member to view messages

Sewdelish signature

Tuesday, 5 February 2008

Cleaning Old Antique & Vintage Sewing Machines - Updated Previous Post


For those of you who have been waiting, I have uploaded some more photos to my Cleaning Old Antique and Vintage Sewing Machines Tutorial. I hope this makes the cleaning method a little easier to follow.
Antique Singer 66-1 Treadle Back Handwheel
Sewdelish signature

Wednesday, 2 January 2008

Christmas Stocking Sewn on My Treadle

After practicing sewing with my Singer treadle sewing machine on countless scraps of fabric I have finally managed to make something. Well I actually made it just before Christmas I have to admit and just found it again so I could post it here.

A lovely blue Christmas stocking made from felt, fleece and ric rac. Very simple in design, but fun to make nonetheless and it took less than half an hour.

Christmas Stocking Treadle
I suppose this does not need to be just for Christmas, it would make a great gift bootie bag for a new baby or little boy.


There is something special about sewing on a treadle. With no electricity and powered by my feet rocking back and forth rhythmically, I can't help but wonder about all the women that used my treadle in years gone by and what they made, dresses(maybe wedding gowns), quilts, work and play clothes. Then I remember my Singer sewing machine attachments and daydream about darning, embroidery, pin tucks and gathers made on a simple straight stitch machine.


What a hectic life the women of old must have had. Raising several or more children, keeping house- cooking cleaning and making clothes for everyone. All done with no electricity and the same duties day after day! We are very fortunate to have electricity, although I can't help but wonder sometimes that all the gadgets that make things quicker our lives easier, in turn make it busier because we feel we need to do more and fit more into our day.
Sewdelish signature

Make a Rag Quilt

I recently had a go at making a rag quilt and this is the result. A shabby chic look! It took 2 weeks to complete and I love it! You may have noticed that I used it for the backdrop when I took photos of my newly acquired Singer Puzzle Box. These quilts are an ideal project to make on an antique or vintage sewing machine as straight stitch is all you need.


 Free Instructions and Pattern - Download Here

To make a rag quilt, work out the following (just copy and paste text into a word document to print). A word of warning - PRESHRINK all fabric first before cutting. I forgot to preshrink the filling so now I have a rather puckered, puffy looking quilt. It has given it a more homely appeal though, which I like.
The number of squares you would like across (don’t allow for seam allowance at this point)______(I had 10)
The number of squares down_____(I had 15)
Design the pattern you would like your squares to make on the blank template. Mine was diagonal, but you can have random, stripes or even create a picture.


To cut your squares they need to be the finished size plus 3” (2.5cm) to allow for the frayed finish_______(mine were about 5 ½” or 14cm)
Make a note of the number of squares required for each colour.
You need at least 3 layers of fabric for the quilt. Course cotton fabric that frays easily is best. I used approximately 2 1/2m each of the backing and filling and 1m of each for coloured squares on the front.
  • A backing
  • A flannelette filling (at least 1 layer)
  • A top layer (consisting of various colours or just one)
Cut all squares required using a rotary cutter, ruler and a matt.
Assemble piles of fabric in order
  1. backing face down
  2. filling
  3. top layer right side up
Repeat for each square required for your quilt. If you have room lay them out according to the pattern you created earlier.
When sewing the fabric sandwich blocks together treat the backing fabric as if it is the right side. Thus making it easier to remember to sew backing to backing (right sides together). It will all be right in the end you'll see.
Each seam needs to be 1 ½” (3.7cm) and you need to be fairly accurate to help align latter squares. Use a double or triple short straight stitch setting on your sewing machine or sew each seam twice (trust me on this it is necessary to extend the life and wear of the quilt!).
Sew the quilt one row at a time and then sew the completed rows together, aligning all the joins.
For the final sewing part, stitch all the way around outside edges of the quilt.
Now for the snipping. You will need a pair of comfortable, good quality scissors (you will be grateful later). I bought a pair of Fiskars spring grip scissors in my local sewing shop and incidentally I found some identical in the hardware shop 1 week later called pruning snips also made by Fiskars!
Snip into each seam almost to the stitching every ¼” (0.5cm). This needs to be done all over. Just be careful not to cut the stitching or you may need to do repairs!!

SNIP, SNIP, SNIP, SNIP, SNIP, SNIP
Once all the snipping is done, including the outsides edges, the quilt can be washed then dried in a dryer.
Washing produces a huge amount of fluff and lint, so part way through the cycle while water is still in the machine use a sieve to scoop it out. It is much easier to remove the lint this way and will save wear and tear on your machine and dryer. The quilt will need to be washed and dried several times to produce a really frayed effect, but it will be well worth the effort.


Iron and then use or display your quilt.


Sewdelish signature

Saturday, 15 December 2007

Cleaning Old Sewing Machines

Clean Restore Singer 201K Sewing machine
This is my Singer 201K from the 1950’s. When I bought it, it had only been used as a hall table for many years and the machine itself was never used by the owner. The table was in really good condition and clearly had been polished regularly. The machine however needed cleaning and the power lead, pictured below, needed replacing. Thankfully after a good clean and service I ended up with a great working machine. Here I will share with you how I clean my machines, no matter how old they are.
Vintage Singer 201K Sewing Machine in cabinet


Things you will need:
  • Newspaper - to sit your machine on and protect the surface underneath
  • Rags - lots for cleaning and polishing
  • Paper towels to sit cleaned items to dry
  • Toothbrush or paintbrush - to clean stubborn areas
  • Cotton tips
  • Vacuum cleaner with a Computer attachment (it allows you to reach small areas easily)
  • Kerosene
  • brass or silver cleaner
  • good quality sewing machine oil
  • gloves to protect your hands from the dirt and chemicals
  • notepad and pencil or digital camera to make notes as you take things apart
How I Clean My Old Machines:
Vintage Singer 201K Sewing Machine clean underneath
Remember to only do one section of your machine at a time to make it easier to put back together!!!It can help to take photos or takes notes as you work. If you have a manual for your machine keep it handy, just in case you need to refer to it
Take note of where the parts belong. Then remove all the shiny parts and clean with brass or silver cleaner. I was told by my local sewing machine repairer that brass cleaner is much softer on the metal parts and will cause less wear in the long term. If find it safer to remove the needle from the machine during the cleaning process. 
Remove lint from the bobbin case and under the machine. I use my vacuum cleaner with a tiny computer nozzle attached to make it easier. Some people use canned air but I don’t like the dust blowing around getting into places that may cause damage later. I prefer to get rid of it completely with the vacuum.                                                                                                                                               NOTE: If you find something that looks like a piece of red felt, LEAVE IT THERE! It is felt and helps to lubricate things. It is meant to be kept oiled. Do not take it out. The model in the photo below is a Singer 66-1   Singer Antique 66-1 Sewing Machine Red Felt Bobbin Case
Clean areas under the faceplate and underneath with some kerosene on a rag, paintbrush or cotton tip. This is also safe to use on decals but I would be careful on worn areas anyway to help preserve them. Don’t forget the feed teeth. Wipe away any excess.
Oil the machine on all the moving parts where metal touches metal. It also helps to refer to the manual if you have one for your model. You can find out the model number of your machine at ISMACS using the serial number which is found on the front base plate of the machine. This site will also tell you approximately when your machine was manufactured.
Replace all removed parts. Worn bobbin winder tires and belts should be replaced with new ones, especially if you intend to use the machine. Keep the originals.
Once you have finished cleaning, the whole machine can then be given a polish with some machine oil or a wax and polish with a gentle car wax. I just used sewing machine oil as I didn't have any car polish. Just be careful over the decals. Do not allow any oil to come into contact with the rubber bobbin winder tyre or belt. This will cause them to perish quicker, and will make them slip if you intend to use the machine.
Any gears on the machine will need to be greased. I use grease from my local sewing machine repair shop. Follow your manual for application points as grease should NEVER be used like sewing machine oil and the oil should NEVER be used in place of grease
Inspect any electrical wires and cords if your machine has them. Damaged ones should be repaired or replaced by a licensed electrician. A power cord that looks like this really needs replacing, even if it does work! This one has perished from being in the same coiled up position for years. I usually give this job to an electrician. Singer 201K Sewing machine perished cord
Polish the wooden table or bentwood cover if you have one with a quality wood polish. I used marveer.
If you find this helpful or something is not quite clear, please feel free to leave a comment or email me.


More information on antique and vintage Singer sewing machines can be found here at my post on Helpful Antique Sewing Machine Links, ISMACS and Treadleon.


Sewdelish signature

LinkWithin

Related Posts Plugin for WordPress, Blogger...