Showing posts with label Tutorials. Show all posts

Friday, 8 November 2013

Crafting - Make Your Own Gorgeous Twist Ties!

These are awesome! I came up with idea when I saw some red and white candy striped twist ties on a party site online. I didn't need several thousand of the same ones so decided to try and decorate some plain twist ties I already had. Now I can have them in any colour I like! They are so easy to do even the kids will enjoy this activity. They are perfect for decorating small gift bags or tying up a biscuit or two for lunches.


SUPPLIES:

Plain twist ties - plastic or paper (leave them attached together)

Markers -  Permanent markers are best for plastic, almost anything works for the paper ones (I used sharpies and bic pastel permanent markers)

Ruler - if you prefer not to draw lines freehand


Draw stripes on the front first, then copy the lines in the same place on the back. My twist ties are slightly transparent so that makes it easy to follow the same pattern on the back. Diagonal and horizontal stripes work really well. It does not matter if the lines are not perfect as you won't even notice after the ties are separated.


VARIATION:

I decorated this  lot of twist ties with alcohol inks. (The Tim Holtz Ranger inks are the ones I have. You can purchase them at scrapbooking stores.) These are much quicker to make than the marker ties above and don't even matter if the front and back do not match.


These new twistie ties are perfect for tying up party bags or even add a little fun to school lunches or tiny gifts placed in a small gift bag.


Sewdelish signature

Monday, 7 January 2013

How To Tutorial - Printing and Organising My Cricut Cartridge PDF Handbooks

Printing and Organising Cricut Cartridge Handbooks

I have had a number of requests for more details on how I print and organise my cricut handbooks, so I have put together a tutorial on how I did this for you. (Click on the images for more detail)

I only wanted to print out the pages that showed all the different cuts on the cartridges and did not want the instructions or different languages. There are two methods of doing this, the quick method and then my preferred method. My preferred method includes the title of the cartridge and allows you to choose the orientation of the pages and how many pages you want to a sheet.

******************************************************

QUICK METHOD


These files have already been organised in a handbook style but many do not always include the title of the cartridge of the first page when you print them out.

Printing and organising cricut cartidge handbooks

1) Visit the cricut message board to this link here. Find the cartridge you are after and locate where to download it from. NOTE: this method automatically print 6 pages per sheet

2) Download and save to your computer, then simply print out.

******************************************************

MY PREFERRED METHOD FOR PRINTING CARTRIDGE HANDBOOKS


1) The cricut cartridge library is no longer available on Provocraft's website. However, if you go to cricut website shop you can download the handbook there with a few steps. Search the cartridge you are looking for, click on details link, at the end there will be a "digital handbook" link to click and download. Save it to your computer.

Click on image to enlarge.


NOTE: Some cartridges either do not have a handbook or are not made available. The handbooks are now watermarked to protect provocraft's copyright.


2) Open the pdf handbook you need. NOTE: For printing the handbooks Do not look at the page number on the actual handbook pages but rather the page number of the actual pdf file at the top as the title is really page1.
Note the page number for the title page (page 1), then search through the handbook for the first page where the cut images begin (note this) and the last page number (note this too)


Printing and Organising Cricut Cartridge Handbooks

On this example here for Teardrop the first page number we need is 24 but on the handbook pages itself it is noted as 23.

Printing and Organising Cricut Cartridge Handbooks


The last page of images we need is page 74.

Printing and Organising Cricut Cartridge Handbooks


3) To print multiple pages per sheet. Choose to PRINT PAGES then enter the pages numbers you took note of in the previous step.

PAGE SCALING - choose multiple pages per sheet
PAGES PER SHEET - I choose 2 by 4 to save paper but you can 2 by 3 if you want to.

Printing and Organising Cricut Cartridge Handbooks

I print my handbooks in portrait mode but you can do them in horizontal mode if you want to make the pages larger and easier to read but that will use more paper.

Check the preview is correct then click OK to begin printing.

******************************************************


Place all the handbook sheets into clear pockets and then put into a file in alphabetical order. I always begin the first page of each cartridge in a new pocket then then place the following pages back to back.


Printing and Organising Cricut Cartridge Handbooks

Cut the tabs from Tags, Bags Boxes and More it is cut at 1 and 3/4 inches. It is the mirror tab shape on page 34 of the handbook. I used my gypsy but you can use your cricut to fill the page, Design Studio or Cricut Craft Room. I cut as many as I could fit on a 12 x 12 sheet of each colour:

I colour co-ordinated mine to match my cartridges

Orange/peach tabs are for font cartridges

Blue for shapes cartridges

Green for lite and seasonal cartridges

Printing and Organising Cricut Cartridge Handbooks

If you label the tabs like on my photo here and then tape or glue to the first page of your handbook, you will be able to see the names from both sides as you browse through your file.

Printing and Organising Cricut Cartridge Handbooks

******************************************************

Print out your own Cutting guide sheet with your own cricuts settings to keep in the front of your folder. You can find it here. I use mine all the time as the settings on my cricut varies from the standard settings.


Sewdelish signature

Friday, 12 June 2009

Shower Cap Tutorial - Instructions Updated

sew how make Shower Cap showercap pattern tutorial

I am going through some of my older posts and have updated my Shower cap tutorial with loads of step by step photos and improved the instructions. It should make the instructions much clearer now. It's something I meant to do a while back but just completely forgot all about it.

If you make a showercap using my instructions I would love to see a photo. Just post a link to it in a comment below or on the tutorial post.
Sewdelish signature

Wednesday, 1 April 2009

Make A Quick No Sew Sweater for a Chihuahua Puppy or Small Dog - Tutorial

This is my latest sewing, well actually non-sewing project! Tell me what you think!

Make Chihuahua coat no-sew puppy dog sleeve sweater pattern

It has been a while since I have needed to make puppy jumpers, and during a cold spell here in the middle of summer I needed a couple of coats for the puppies in a hurry. By the time the cold sets in here for winter I expect I will need to make some larger ones!

I would have loved to share pics of both of our chihuahua girls sporting their new clothes, but Bell just does not sit still enough to photograph! So here is Tinker modeling her Pink Spotted No-sew Baby Sleeve Sweater!

Chihuahua coat make no-sew jumper puppy dog sleeve sweater pattern

Tools Required:

Measuring Tape
Scissors
Sleeve from a baby, toddler or child's sweater (see step one)

Method:

1) Measure your puppy's neck and around the chest. This will give you an idea for the size sleeve you need. I used the sleeve from a baby jumper, but you may need one from an older child or adult depending on the size of your dog or puppy.

2) Cut the sleeve from the garment you are using. The top should be as long as your dog from the back of the neck to the start of the tail. If you have a male dog the part underneath the coat (where the seam is) will need to be shorter to allow them to go to the toilet without soiling the jumper.

Chihuahua coat make no-sew jumper puppy dog sleeve sweater pattern

3) Make sure the wristband will fit over your dog's head. If it fits, great go onto the next step, otherwise do as I did. I cut the ribbing (wristband) from the sleeve, as it was too small to fit over my little chihuahua's head. I rolled the neck to hide the cut edge and make it softer around the neck.

Chihuahua coat make no-sew jumper puppy dog sleeve sweater pattern

4) Measure from your puppy's neck to the top of the front legs, and also the distance between the front legs. These will help you work out where to cut the holes for the paws to fit through. Make sure they have room to walk and play safely in them. If the holes are too big the paws can get stuck inside the jumper making it impossible for them to walk. Cut the holes in the sleeve and then your dog is ready to try on his or her new outfit!

Chihuahua coat make no-sew jumper puppy dog sleeve sweater pattern

Chihuahua coat make no-sew jumper puppy dog sleeve sweater pattern

NOTE:
Putting on a dog coat should be a positive and fun experience for your puppy. So whilst your puppy is learning to behave getting dressed, offer lots of rewards of praise and food treats.
Sewdelish signature

Friday, 27 February 2009

How to Zipper Tutorial at twelve 22

Shower Cap sew make showercap make-up zippered pouch Breast Cancer Awareness Fabric


Many of you probably remember the Breast Cancer Awareness shower cap and make-up bags I made from a thrifted pillow case. Well I was planning on creating a tutorial for the zippered pouches, and then I found this tutorial over at twelve22.com. It is basically the same as the way I sew mine so I thought I would share with you.

sew make showercap make-up zippered pouch Breast Cancer Awareness Fabric

The tutorial is easy to follow and great for new sewers wanting to become confident using zips in their projects. These zippered lined pouches are great for gifts and are relatively quick to make.

I have made lots of these in different sizes to use for all sorts. Toothbrush and paste, make-up, medicines when traveling, first aid kit, books, and pencil cases.

Whether you are new to sewing or not, these are fun projects to make that are handy a quick to sew.

sew make showercap make-up zippered pouch Breast Cancer Awareness Fabric
Sewdelish signature

Wednesday, 27 August 2008

Some Sewing - How to Make a Shower Cap - Tutorial

sew how make Shower Cap showercap pattern tutorial

Here is a fairly quick and easy sewing project to try that is great to make for yourself or to give away. It is also a great way to keep your children's hair dry if you make it in fabric they like.

I would love to see a photo if you make a shower cap using my instructions. Please provide a link to this post if you wish to share these instructions with others.

Materials required:

Fabric (I use satin or lightweight cotton so it dries quickly)
Thin plastic (disposable tablecloths or plastic shower curtains are great for this)
Satin binding
Cotton binding
Narrow elastic
Thread to match
Biro for marking on the plastic
Straight stitch sewing machine (yes you can even make this on a treadle!)

Directions:

1) Make your pattern for the shower cap using fairly large paper. You need to cut a circle approximately 55cm in diameter. If you have really long hair or are likely to have rollers under it I would recommend 60-65cm. For children 50cm is usually sufficient.

2) Cut 1 piece in your chosen fabric and one piece in plastic for the waterproof lining

sew how make Shower Cap pattern showercap tutorial

3) Pin around the very edge with wrong sides together. This keeps everything in place as you sew. Satin and plastic are very slippery when you are trying to sew the two together. Keep the pins right to the very edge so any pinholes created in the plastic will be hidden under the binding when you sew it on. Baste all the way around.

sew how make Shower Cap pattern showercap tutorial

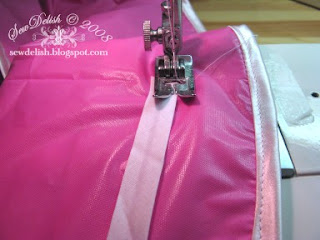
4) Open out the satin binding and sew it to the inside(plastic side) of the showercap as in the picture below. Fold over the end before you begin to stitch so you will have a neat finish.

sew how make Shower Cap pattern showercap tutorial satin bias binding

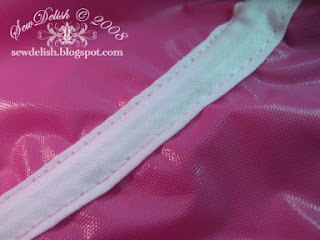
5) Once you have stitched all the way around, fold the rest of the binding over the seam and over to the right side of the shower cap and stitch in place from the fabric side. This step covers the previous stitching lines. Sometimes I add lace at this step too.

sew how make Shower Cap pattern showercap tutorial satin bias binding

6) With the plastic side facing up on the shower cap, measure and mark 5cm (2") in from the edge all the way around. This is where you will make casing for the elastic. Fold the end of the cotton binding over then sew the binding along the edge onto the line you marked earlier. DO NOT overlap or sew over the ends as you will be threading elastic through there shortly. Refer to pics below. Repeat sewing along the other edge of the binding to create two stitched lines. Tie off any loose threads.

sew how make Shower Cap pattern showercap tutorial satin bias binding

sew how make Shower Cap pattern showercap tutorial satin bias binding

sew how make Shower Cap pattern showercap tutorial satin bias binding

7) Thread the elastic though the casing. I usually use a small safety pin or an elastic bodkin. Use enough elastic to make it comfortable and not too tight. Secure the ends of the elastic either by sewing or tying them in a knot. Hide the ends in the casing using a pair of tweezers to push them in. Decorate with the outside of your new shower cap with a satin bow or a fancy button if desired.

These showercaps can be washed by hand in lukewarm water or in a cold wash in the washing machine on a gentle cycle.

Here is a shower cap and a couple of make-up bags I made using a thrifted pillowcase that was made from Breast Cancer Awareness Fabric.
Sewdelish signature

Tuesday, 26 August 2008

Plagarism and Blogging

To those of you that subscribe to my blog or are regular readers, there will be a few changes happening in the near future. I have had to change the feeds back to partial feeds again due to some of my blog content being stolen.

This person has directly copied one of my blog posts including the watermarked images and pasted it into their blog as if it were their own. They have not provided a link back to my blog and also what is worse, they are making money from my work using Google Ad sense.

I will not be providing the link to the offending blog because I feel they do not deserve the link from me, visitors nor money raised from any ad clicks. There are a number of posts on the offending blog that I believe to be stolen from other bloggers and again no credit has been given to the original authors. The whole blog looks like it was created in a few days just to make money from ad clicks.

I am flattered that someone would love to share my work, but to give me no credit or a link back and completely plagarise everything is more than frustrating. The post copied is not the issue here, just the fact that it was copied entirely to make money from and without permission sought nor credit given. I have now reported the incident to Ad sense as the blogger is not only breeching copyright laws, but also Google Ad sense policies.

If you are a blogger yourself I would recommend putting a watermark or name and copyright information on all of your photos before you upload them to the internet. That way there is no dispute as to who they belong to.

I love to inspire creativity in others, just as I find inspiration from the work of others, but credit needs to be given where it is due. I regret having to make changes, but I feel it is necessary and hope it will not prevent your enjoyment of visiting.
Sewdelish signature

Saturday, 31 May 2008

Cards Using Swiss Dots Embossing Folder and Cuttlebug

Cuttlebug Swiss Dots Card make Hero Arts stamps

Now that these cards have been given away I can now post them here. They are both constructed in basically the same way.

Cuttlebug Swiss Dots Card make Hero Arts stamps

This is a run down of how I made them.
  1. Using my Cuttlebug and the Swiss Dots embossing folder I ran the cardstock through the machine to create the raised dots effect on the front. I left approximately one inch (2.5cm) unembossed.
  2. I then very lightly and randomly ran an ink pad over the dots to create a little more definition. (it is a tad difficult to see in the photos, but trust me it's there) I used a copper colour on the pink card and jade green on the sage coloured card.
  3. For the pink card I added a strip of spotted paper printed from a freebie download(I can't quite remember where at the moment, but will post a link as soon as I find it). For the sage card I stamped a flourish using lavender ink and Hero Arts Designer Butterflies Clear Stamp set.
  4. Finally I added some ribbon to match.
These cards were so much fun to make and so quick too, less than 10 minutes each. I love cards that make up quickly, that look great and I will be using this basic design sketch again. By varying the colours, papers, stamps and embossing folders, I will be able to create many different and unique cards.

Why don't you have a go. If you don't have embossing folders, use something else instead. Try miniature stamps repeatedly stamped over the card or even textured cardstock or handmade paper. I would love to see your creations. Post a link in the comments and I will pop over for a peek!
Sewdelish signature

Sunday, 2 March 2008

Water Crystals Craft Project

Water Crystals Flowers Vase
We did some gardening yesterday and used water crystals in the hanging baskets. It got me thinking of another use for them. I placed some in a vase for a different, but pretty effect.

See the beautiful bubbles created.

Water Crystals Flowers Vase
Just in case you don't know what these are, they are tiny crystals slightly smaller than rock salt. You add water to them, and they expand up to several hundred times their own size. They help the soil retain water, so are perfect in hot, dry climates.

How to Create This:

Add 1/2 teaspoon of water saving crystals and 1-2 drops of food colouring to about 1 & 1/2 cups water in a jug or 1 ltr container. I used my vase as it is just the right size.

Water Crystals Flowers Vase

The crystals will take about an hour to expand fully. Stir to create the bubbled effect, then add a selection of flowers. Extra water can be added every couple of days to help the crystals retain their size. Once flowers are finished the crystals can be buried in the garden or hanging baskets to continue being useful.
Water Crystals Flowers Vase
The water saving crystals should be able to be purchased at most garden centers or nurseries.
NOTE: DO NOT allow pets or children to swallow!

*** Don't forget to enter the Craft contest I have on at the moment. You will find the link on the left. It is free to enter and open worldwide!
Sewdelish signature

Friday, 15 February 2008

Make SewDelish Chocolate Bars

Sewdelish Chocolate Bar Wrapper

I have been chocolate making again and I had some melted chocolate left over. I poured it into a large chocolate bar mould. After it had set I remembered about some chocolate bars we made for gifts last year, so I decided to share with you the process. If you are not up to melting chocolate or can't find a mold, then you can use a purchased bar of chocolate and decorate that.

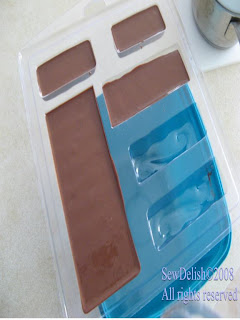
1) Melt chocolate over a double pan, then pour into mould (mold for those of you from US)

Chocolate Bar Mould Mold

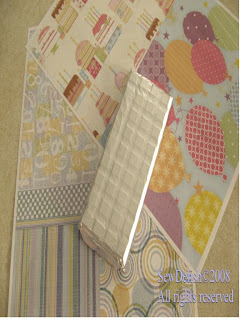
2) Allow to set while you clean up and prepare the wrapper. I downloaded some background papers from the Crafts Beautiful website . You need to be a member, but it is free to join. There are also some sites that have printable wrappers and even software you can download to make your own designs.

Download Crafts Beautiful Printable Paper

3) Once the bar is set, wrap it in some aluminum foil. This gives a professional touch and also helps with the next step.

4) Measure the height of the bar (your wrapper will be this high) and then measure the whole way around the bar and add 2-3cm(1") for overlap. Cut your paper to these measurements.

Measure Chocolate Bar

5) Centre the chocolate bar in the middle of the wrapper paper and use tape, glue or sticky dots to adhere the overlapped ends of the wrapper together. Try not to stick it to the foil. Then you will be able slide off the wrapper and turn it into a card front later.

Glue Wrapper
6) Decorate the bar with other embellishments if you wish. I used lace, ribbon and buttons for a real feminine chocolate bar. The paper and embellishments can be changed to suit the taste of the recipient (haha no pun intended).

Embellish Chocolate Bar Wrapper
Sewdelish signature

Tuesday, 5 February 2008

Cleaning Old Antique & Vintage Sewing Machines - Updated Previous Post


For those of you who have been waiting, I have uploaded some more photos to my Cleaning Old Antique and Vintage Sewing Machines Tutorial. I hope this makes the cleaning method a little easier to follow.
Antique Singer 66-1 Treadle Back Handwheel
Sewdelish signature

Friday, 18 January 2008

Free Download My Rag Quilt Instructions

Make Rag Quilt Pattern Instructions SewDelish Shabby Chic

I have managed to make my rag quilt directions into a file that you can download and print for FREE. It also has a blank table for you to design your own pattern. Please let me know what you think. If by some chance you find any errors or the instructions are not very clear, I can be contacted by email through my profile.
SewDelish (C) Make a Rag Quilt Instructions PDF  
If you are having trouble viewing this file it can be downloaded from here.
Sewdelish signature

Monday, 7 January 2008

Cupcake Pincushions

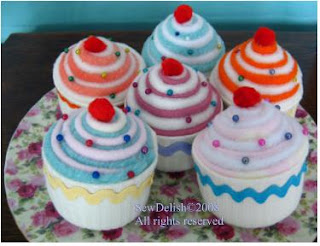
make sew pin cushion pattern Cupcake Pincushions tutorialThese are my SewDelish yummy cupcakes!

I would like to give credit to the person who posted this tutorial on how to make them and originally inspired me to make my own version. As usual I very rarely do anything exactly to directions and this project is no exception. Not only did I use different fabrics, but I also changed the way they are assembled, making them quicker and more stable.

I used some strips of fleece fabric leftover from making jumpers and tracksuits for the cake and icing and wide ribbing to make the patty cases. A couple of people have said the patty cases look like socks. I don't see any reason why they could not be used as socks are probably more readily available. My cupcakes are then completed with some pin sprinkles and a pom pom cherry on the top!


make sew  pin cushion pattern Cupcake Pincushions tutorial make sew  pin cushion pattern Cupcake Pincushions tutorial
make sew  pin cushion Cupcake Pincushions tutorial

Everything is hand sewn in place, including the cherry on top. I have had a few orders for gifts of these from friends and family, so I now have a basket in my lounge room with everything I need to make them. It is wonderful to relax in the evenings, watching television and actually feel like I am being productive at the same time.

(Added 16 Jan 2008) I also just found some like these by Betz White who uses recycled wool sweaters to make her cupcakes. Great idea if you are not allergic to wool!
Sewdelish signature

LinkWithin

Related Posts Plugin for WordPress, Blogger...