Showing posts with label Gifts. Show all posts

Friday, 8 November 2013

Crafting - Make Your Own Gorgeous Twist Ties!

These are awesome! I came up with idea when I saw some red and white candy striped twist ties on a party site online. I didn't need several thousand of the same ones so decided to try and decorate some plain twist ties I already had. Now I can have them in any colour I like! They are so easy to do even the kids will enjoy this activity. They are perfect for decorating small gift bags or tying up a biscuit or two for lunches.


SUPPLIES:

Plain twist ties - plastic or paper (leave them attached together)

Markers -  Permanent markers are best for plastic, almost anything works for the paper ones (I used sharpies and bic pastel permanent markers)

Ruler - if you prefer not to draw lines freehand


Draw stripes on the front first, then copy the lines in the same place on the back. My twist ties are slightly transparent so that makes it easy to follow the same pattern on the back. Diagonal and horizontal stripes work really well. It does not matter if the lines are not perfect as you won't even notice after the ties are separated.


VARIATION:

I decorated this  lot of twist ties with alcohol inks. (The Tim Holtz Ranger inks are the ones I have. You can purchase them at scrapbooking stores.) These are much quicker to make than the marker ties above and don't even matter if the front and back do not match.


These new twistie ties are perfect for tying up party bags or even add a little fun to school lunches or tiny gifts placed in a small gift bag.


Sewdelish signature

Saturday, 6 August 2011

Wallet Money Cards

Here are a few money cards I made a while ago. For some reason I forgot to publish the post and  pics so here they are. Oops just realised a couple have the wrong watermark too!

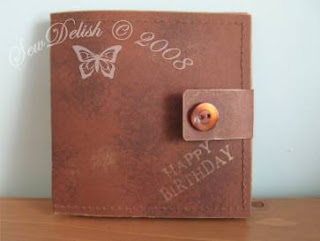
Anyway the first wallet card was made using the template from Valita's Designs. Instead of false stitching though I did real stitching on my sewing machine which was so much easier and quicker to do. It also has the benefit of looking more realistic too. I used cling film to stamp various inks onto brown card to give it the  textured and worn appearance of old leather.

Money Cards Wallet Cards Male

Money Cards Wallet Cards Male

Money Cards Wallet Cards Male

 The wallet closures are made from sticky backed velcro and coloured to match the card with acid free permanent markers.
Money Cards Wallet Cards Male Velcro


I have since modified a few things on the template so I can make use of only one A4 sheet of card. My template also has a double closure that holds the card open and still looks like a closed wallet at the same time. These wallet cards were brighter as they were intended for children.

Money Cash Cards Wallet Money Card

Money Cash Cards Wallet Money Card

Money Cash cards Wallet Money Card

Money Cards Card Wallet Money Cards
The recipients of these loved them so much they ended up taking the wallet shopping with them just like a real one!
Sewdelish signature

Tuesday, 3 May 2011

I've Been Sewing some Cute Flannelette Baby Bibs

Sewing cute quick make baby bibs flannelette and binding

I made these cute baby bibs a little while ago from some leftover flannelette I had. They all have a patterned side and a plain side so that I can use them either way then they also coordinate with more outfits!

They are so quick and easy to make and a great project even for a sewing beginner. The only stitch involved is straight stitch so if you have and antique or vintage sewing machine that only sews a straight this is another project you can make easily.

I drew a simple bib shape onto some paper and used that as my pattern. The ties are made from bias binding that I already had on hand so cost was minimal.
Sewdelish signature

Saturday, 18 July 2009

Making A Chain Maille Bracelet

Make Jewellery Chain Maille Bracelet Jewelery Beads

I have had my eye on this Chain Maille bracelet since the launch of the Make Jewellery magazine online party in April and I have finally finished my version. I have never attempted chain maille jewellery before so I printed out the instructions and they were very easy to follow. If you can open and close jump rings as well as wrap a bead with wire you already have all the skills you need.

Make Jewellery Chain Maille Bracelet Jewelery Beads

I ended up pinning my bracelet to a cushion as I worked so I could see where I was up to as I added the jump rings. I spent 5 minutes here and there until all the rings were joined and then spent a few weeks trying to work out just what beads I wanted on it. LOL One must rush these things after all!

I finally decided on a mixture of glass and shell beads in pink and green pastels. I love how they look with the silver rings. These bracelets would make a beautiful gift and look gorgeous too.
Sewdelish signature

Thursday, 16 July 2009

Printable Lemon Curd Recipe

Make Lemon curd Butter Recipe Download Printable Free

I made some lemon curd a few weeks ago and thought I had already posted about it, but for some reason the post seems to have disappeared. So now for attempt number 2......

Make Lemon curd Butter Recipe Download Printable Free

I absolutely love lemon curd or as some call it lemon butter. Either way it tastes divine on a slice or three of freshly home-baked bread. I use a recipe that I have had for years. Unfortunately I can't remember where I found it, I can only think it may have been a CWA Recipe book or Mrs Beeton's Recipe Book. Scroll down for the recipe.

Anyway the reason I love this recipe is that it uses whole eggs rather than just the yolks so you end up with a larger quantity and no wasted egg whites. A jar of lemon curd makes a lovely gift, perfect for hampers or just a small thank you.

Make Lemon curd Butter Recipe Download Printable Free

I sterilise all my jars and utensils in the dishwasher and then place them in the oven at 100°C to drain and dry.

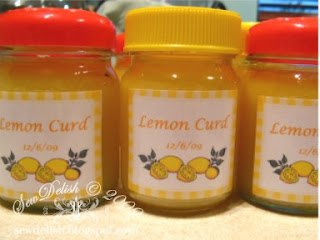
The labels I made using Microsoft publisher on the business card setting. I just placed the text and images where I wanted them and printed them out. I adhered them to the jars using clear packing tape, so it would protect the label from moisture damage (I use an inject printer) and to make them easy to remove once the jars were empty.

Make Lemon curd Butter Recipe Download Printable Free

And now I guess you are all waiting for the recipe............

Just right click on the image that you prefer below to open in a new tab and then save to your computer or print it out.

Make Lemon curd Butter Recipe Download Printable Free


Sewdelish signature

Monday, 25 May 2009

Button Crafting - Is it a Necklace, a Belt or a Bracelet?

Make Buttons Jewelery Shabby Chic Button Wire Necklace Bracelet Belt Jewellery

If you have been following my blog you will know I have just a few(wink wink) buttons! So I decided to actually use some of my buttons rather than just play with them LOL! I also entered this into a challenge on the Crafts Beautiful forum for the launch of the new Sew magazine.

Make Buttons Jewelery Shabby Chic Button Wire Necklace Bracelet Belt Jewellery

I started out with the intention of making a button belt and then once it was finished I thought it would make a gorgeous button necklace when combined with a handcrafted pearl necklace.

Make Buttons Jewelery Shabby Chic Button Wire Necklace Bracelet Belt Jewellery

It also looks funky as wrap around bracelet! It might even make a really interesting headband as well but I think I prefer it as a shabby chic style necklace.

Make Buttons Jewelery Shabby Chic Button Wire Necklace Bracelet Belt Jewellery

It took me about 2 hours to design and create. All the buttons are threaded onto one really long piece of wire folded in half. No two buttons the same with 61 used in total. It took me ages to go through my buttons to find all the ones in just the right colours with each one being different. I made a loop closure as a feature at one end with pearl beads. I varied how I wired the buttons too. Some I threaded the wire through simply, some twisted, or criss-crossed, some over and under opposite ways and a few have been thread through backwards and the wire twisted into a coil on the top.

Make Buttons Jewelery Shabby Chic Button Wire Necklace Bracelet Belt Jewellery

I am not generally one for buttons on jewellery but this one I am really happy with. I would love to hear what you think.

Sewdelish signature

Thursday, 21 May 2009

Bind-it-all Special Secrets Notebook

Chinese brocade fabric notebook make Bind-it-allAlign Center

Here is a notebook that I made for my DD. Her favourite colour is turquoise. This is a special book for her to write all the things she wants to as she grows from a young girl into a young lady.

The notebook is covered in chinese brocade fabric. The beads are what was left from making her Princess Jasmine costume a couple of years ago and they hold a special place in her heart as it was a very memorable occasion for her. I lined the inside of the covers in scrapbooking paper and also covered a pencil to match. I used my bind-it-all and then I tied a length of turquoise ribbon to the wires on the inside for my daughter to use as a bookmark.

Chinese brocade fabric notebook make Bind-it-all
Sewdelish signature

Saturday, 25 October 2008

Gold and Blue Male Birthday Card

DH commissioned me to make a card for one of his mates as his birthday is coming up.
He wanted something like the pink and chocolate card I made, but obviously suitable for a man.

Male birthday card

So this is the finished card after DH chose the colours and the stamp he wanted me to use. Personally I find male cards normally so difficult to make, but this one was fun. I will probably make a few like this just to keep on hand for future male birthdays and other occasions. Let me know what you think. Here is a close up photo of the gold embossed flourish stamp from Kaisercraft.
Male birthday card Flourish Blue and Gold close up

Just a quick note too: I am running behind on my announcement, but I promise you will find out very shortly. Providing no more dramas here you should know by next week.
Sewdelish signature

Thursday, 25 September 2008

From Pillowcase to Shower Cap and Make-up Bags!

Shower Cap sew make showercap Breast Cancer Awareness Fabric

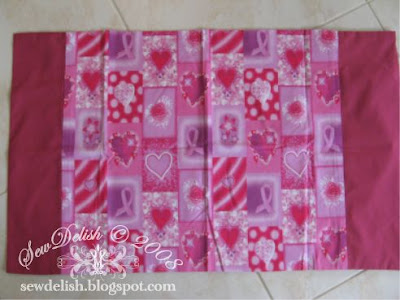
Recently there was a pillowcase challenge over at Craft's Beautiful that I entered. I found a lovely pillowcase in a thrift shop made from Breast cancer awareness fabric.
I fell in love with the fabric as soon as I saw it and then immediately knew what I wanted to make.

Pillowcase sew shower cap make showercap

There has been so much going on here recently that I missed the deadline, only to find out it had been extended. Thankfully I just managed to get my entry finished in time. I will not be looking at pillowcases the same again! LOL I even have a small amount of fabric left over!

So here is my new waterproof shower cap....

Shower Cap sew make showercap Breast Cancer Awareness Fabric

and the matching lined make-up bags

make-up bag make up sew toiletry pouch Breast Cancer Awareness Fabric

make-up bag make up sew toiletry pouch Breast Cancer Awareness Fabric

You can find my directions/tutorial for the shower cap here.


Sewdelish signature

Wednesday, 27 August 2008

Some Sewing - How to Make a Shower Cap - Tutorial

sew how make Shower Cap showercap pattern tutorial

Here is a fairly quick and easy sewing project to try that is great to make for yourself or to give away. It is also a great way to keep your children's hair dry if you make it in fabric they like.

I would love to see a photo if you make a shower cap using my instructions. Please provide a link to this post if you wish to share these instructions with others.

Materials required:

Fabric (I use satin or lightweight cotton so it dries quickly)
Thin plastic (disposable tablecloths or plastic shower curtains are great for this)
Satin binding
Cotton binding
Narrow elastic
Thread to match
Biro for marking on the plastic
Straight stitch sewing machine (yes you can even make this on a treadle!)

Directions:

1) Make your pattern for the shower cap using fairly large paper. You need to cut a circle approximately 55cm in diameter. If you have really long hair or are likely to have rollers under it I would recommend 60-65cm. For children 50cm is usually sufficient.

2) Cut 1 piece in your chosen fabric and one piece in plastic for the waterproof lining

sew how make Shower Cap pattern showercap tutorial

3) Pin around the very edge with wrong sides together. This keeps everything in place as you sew. Satin and plastic are very slippery when you are trying to sew the two together. Keep the pins right to the very edge so any pinholes created in the plastic will be hidden under the binding when you sew it on. Baste all the way around.

sew how make Shower Cap pattern showercap tutorial

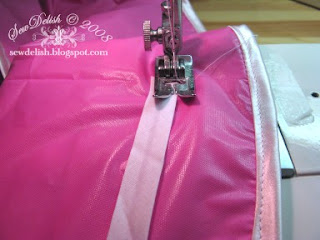
4) Open out the satin binding and sew it to the inside(plastic side) of the showercap as in the picture below. Fold over the end before you begin to stitch so you will have a neat finish.

sew how make Shower Cap pattern showercap tutorial satin bias binding

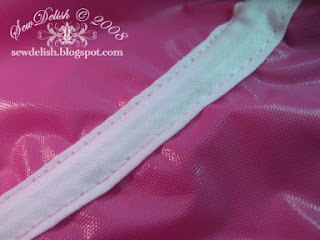
5) Once you have stitched all the way around, fold the rest of the binding over the seam and over to the right side of the shower cap and stitch in place from the fabric side. This step covers the previous stitching lines. Sometimes I add lace at this step too.

sew how make Shower Cap pattern showercap tutorial satin bias binding

6) With the plastic side facing up on the shower cap, measure and mark 5cm (2") in from the edge all the way around. This is where you will make casing for the elastic. Fold the end of the cotton binding over then sew the binding along the edge onto the line you marked earlier. DO NOT overlap or sew over the ends as you will be threading elastic through there shortly. Refer to pics below. Repeat sewing along the other edge of the binding to create two stitched lines. Tie off any loose threads.

sew how make Shower Cap pattern showercap tutorial satin bias binding

sew how make Shower Cap pattern showercap tutorial satin bias binding

sew how make Shower Cap pattern showercap tutorial satin bias binding

7) Thread the elastic though the casing. I usually use a small safety pin or an elastic bodkin. Use enough elastic to make it comfortable and not too tight. Secure the ends of the elastic either by sewing or tying them in a knot. Hide the ends in the casing using a pair of tweezers to push them in. Decorate with the outside of your new shower cap with a satin bow or a fancy button if desired.

These showercaps can be washed by hand in lukewarm water or in a cold wash in the washing machine on a gentle cycle.

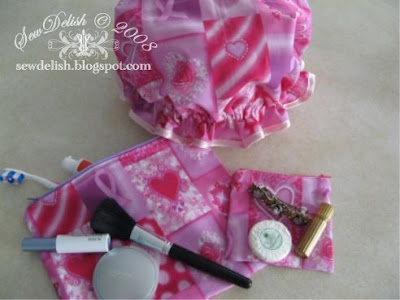
Here is a shower cap and a couple of make-up bags I made using a thrifted pillowcase that was made from Breast Cancer Awareness Fabric.
Sewdelish signature

Monday, 2 June 2008

Christmas Tag

Caardvarks is having a challenge to make a tag inspired by a month of the year. Thanks Lauren for sharing the link.

Here is my tag inspired by December.

cuttlebug tag snowflakes bag purse Christmas xmas
Christmas is a busy time of shopping for gifts and also for those of you lucky enough it may also snow. I have combined these two things to create my tag.

The bag is actually from a double sided tag that I made from holographic shimmer card and then folded to create the bag shape. The background for the main tag is pearlescent card embossed with the snowflakes on my cuttlebug. The base of the handbag is also embossed with snowflakes too. I love the effect the embossing gives.
cuttlebug tag snowflakes bag purse Christmas xmas

Have you noticed the bling on the bag?
LOL Some green and red seed beads with gold crimps.

I think I will probably be making quite a few of these come Christmas.
Sewdelish signature

Saturday, 31 May 2008

Cards Using Swiss Dots Embossing Folder and Cuttlebug

Cuttlebug Swiss Dots Card make Hero Arts stamps

Now that these cards have been given away I can now post them here. They are both constructed in basically the same way.

Cuttlebug Swiss Dots Card make Hero Arts stamps

This is a run down of how I made them.
  1. Using my Cuttlebug and the Swiss Dots embossing folder I ran the cardstock through the machine to create the raised dots effect on the front. I left approximately one inch (2.5cm) unembossed.
  2. I then very lightly and randomly ran an ink pad over the dots to create a little more definition. (it is a tad difficult to see in the photos, but trust me it's there) I used a copper colour on the pink card and jade green on the sage coloured card.
  3. For the pink card I added a strip of spotted paper printed from a freebie download(I can't quite remember where at the moment, but will post a link as soon as I find it). For the sage card I stamped a flourish using lavender ink and Hero Arts Designer Butterflies Clear Stamp set.
  4. Finally I added some ribbon to match.
These cards were so much fun to make and so quick too, less than 10 minutes each. I love cards that make up quickly, that look great and I will be using this basic design sketch again. By varying the colours, papers, stamps and embossing folders, I will be able to create many different and unique cards.

Why don't you have a go. If you don't have embossing folders, use something else instead. Try miniature stamps repeatedly stamped over the card or even textured cardstock or handmade paper. I would love to see your creations. Post a link in the comments and I will pop over for a peek!
Sewdelish signature

Monday, 21 April 2008

Cuttlebug and Crop-a-Dile ll Big Bite Update

Cuttlebug sizzix card embossed wedding card bridal shower
Well as a few of you may know I have a couple of new crafty babies in the house. One is my Cuttlebug and the other a Crop-a-Dile ll Big Bite. For those of you who don't know what these gadgets are I will explain.

The Crop-a-dile ll Big Bite is a type of punch that can punch holes in almost anything from paper to leather and even thin sheets of tin as well as set eyelets. This particular one has a 6 inch reach and can be used to punch holes in the middle of a 12" scrapbook page and quietly set eyelets with ease.

I was slightly disappointed with the Crop-a-dile ll because when I used it for the first time the eyelets were not setting straight. Upon inspection I noted the parts were not aligning correctly thus resulting in an incorrectly set eyelet. The pin should be directly in the centre of the base part below it. You can see by the photo below the reason why the eyelets were not being set straight. Fortunately the company I purchased it from (40 mins away from me) exchanged it for another which has been working like a dream.
Crop-a-dile ll Big Bite Not aligning problem

The Cuttlebug has also been a highly welcomed addition to my craft room and has been getting all the necessary workouts required for all new members! LOL It is a machine designed to make die cut outs and also emboss. It is kind of similar to a pasta machine for want of a better description. What I love about it is that I can make die cuts from paper, card, acetate, fabric and even foil and thin sheets of tin! Dies made by most other companies will also fit the cuttlebug which is a big bonus! You can see some of the shapes I cut out within just a few minutes of unpacking it in this post. This is so easy even kids can use it. Actually there is a version for children named CuttleKids! I have also discovered that EBAY is a fantastic source for dies and embossing folders. The prices are far better than what you pay in a craft store, and that is including the cost of postage! (Actually, just ignore my last comment. I don't want to be bidding against any of you, so don't go and check it out! You do hear me don't you?)

Here is my Something Blue cuttlebug card that I made for a Wedding challenge going on at the moment at the Crafts Beautiful Forum. I made it using a sizzix dress die and a cuttlebug swirls embossing folder. The heart behind the dress I cut out using a Fiskars shape cutter and template. This one would be lovely for a feminine and modern Bridal Shower invitation.

Click on the picture to get a close up view.
Cuttlebug sizzix card embossed wedding bridal shower
Sewdelish signature

LinkWithin

Related Posts Plugin for WordPress, Blogger...