Showing posts with label Crafts. Show all posts

Friday, 8 November 2013

Crafting - Make Your Own Gorgeous Twist Ties!

These are awesome! I came up with idea when I saw some red and white candy striped twist ties on a party site online. I didn't need several thousand of the same ones so decided to try and decorate some plain twist ties I already had. Now I can have them in any colour I like! They are so easy to do even the kids will enjoy this activity. They are perfect for decorating small gift bags or tying up a biscuit or two for lunches.


SUPPLIES:

Plain twist ties - plastic or paper (leave them attached together)

Markers -  Permanent markers are best for plastic, almost anything works for the paper ones (I used sharpies and bic pastel permanent markers)

Ruler - if you prefer not to draw lines freehand


Draw stripes on the front first, then copy the lines in the same place on the back. My twist ties are slightly transparent so that makes it easy to follow the same pattern on the back. Diagonal and horizontal stripes work really well. It does not matter if the lines are not perfect as you won't even notice after the ties are separated.


VARIATION:

I decorated this  lot of twist ties with alcohol inks. (The Tim Holtz Ranger inks are the ones I have. You can purchase them at scrapbooking stores.) These are much quicker to make than the marker ties above and don't even matter if the front and back do not match.


These new twistie ties are perfect for tying up party bags or even add a little fun to school lunches or tiny gifts placed in a small gift bag.


Sewdelish signature

Wednesday, 6 November 2013

Recovering a Childs Chair

After many years of being loved this child's chair really needed recovering. I put it off for ages as I knew it was going to be a project that once begun it needed to be finished or it would never get done. So much work needed to be done to restore this little chair.

Here are some photos of the before, during and after process.

BEFORE!

Fabric and padding had perished or torn in many places due to all the love it has received in its time.  At one stage our two little chihuahuas had even claimed it as their own. Much of the chair was originally just nailed together and this would not work if it were to survive another decade or so, and one chair leg was broken with another at an awkward angle.


As we pulled the perished fabric off the chair I took photos in case we needed to refer to them when putting the new cover on. We found all sorts of kids small toys and pencils that had been lost inside the chair over the years. There was even a pair of scissors! Yikes! I don't want to even think about that one.


The arms of the chair needed to be removed to allow easy access to the rest of the chair for recovering.
They were only nailed on so this was an easy job with a mallet and some muscle.


We added new padding before stapling on the new fabric covers. 


The feet have now been fixed and screwed into place. Hopefully they will stay in place longer than they did being nailed on.


The fabric for the arms needed a little sewing to fit properly, but the rest was stapled before we attached the arms back on the chair, with screws.


A new back on the chair, I photographed this upsidedown as we then added a base to stop any critters making their home in the bottom of the chair.


 The finished Chair!

AFTER

AFTER


Sewdelish signature

Saturday, 6 August 2011

Wallet Money Cards

Here are a few money cards I made a while ago. For some reason I forgot to publish the post and  pics so here they are. Oops just realised a couple have the wrong watermark too!

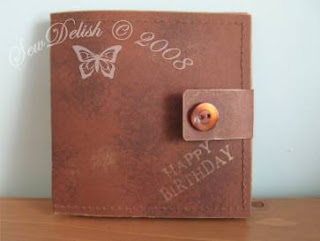
Anyway the first wallet card was made using the template from Valita's Designs. Instead of false stitching though I did real stitching on my sewing machine which was so much easier and quicker to do. It also has the benefit of looking more realistic too. I used cling film to stamp various inks onto brown card to give it the  textured and worn appearance of old leather.

Money Cards Wallet Cards Male

Money Cards Wallet Cards Male

Money Cards Wallet Cards Male

 The wallet closures are made from sticky backed velcro and coloured to match the card with acid free permanent markers.
Money Cards Wallet Cards Male Velcro


I have since modified a few things on the template so I can make use of only one A4 sheet of card. My template also has a double closure that holds the card open and still looks like a closed wallet at the same time. These wallet cards were brighter as they were intended for children.

Money Cash Cards Wallet Money Card

Money Cash Cards Wallet Money Card

Money Cash cards Wallet Money Card

Money Cards Card Wallet Money Cards
The recipients of these loved them so much they ended up taking the wallet shopping with them just like a real one!
Sewdelish signature

Friday, 29 April 2011

Easter Cards using Penny Black Bunny Bath Stamp

Card Make Penny Black Bunny Bath Easter

I made these cute cards for Easter and just had to share them with you. Apart from the colouring and waiting for the stickles to dry they were quick to make.

Card Make Penny Black Bunny Bath Easter


Card Make Penny Black Bunny Bath Easter

The stamp is Penny Black Bunny Bath, it's an old one but new to me. I love this stamp so much I had to make several cards the same but different. The border is decorated with ice stickles in a swirl pattern. The stamp is coloured using a water brush and markers.
Sewdelish signature

Friday, 22 April 2011

Very Feminine Card

cuttlebug swiss dots make feminine lace card

Here is a real girly card made for a birthday for someone in the family a while ago. I normally try and make cards ahead of time so they are ready to use when I need them. This one was no exception hence the date on the watermark!

The centre flower is made using a bottle top flattened in my cuttlebug, then topped with a punched paper circle and ribbon flower.

cuttlebug swiss dots make feminine lace card

I used stickles on the background paper and dimensional pearl paint dots on the lace.

The frame was given to me in a RAK (Random Act of Kindness). It was dry embossed with the swiss dots folder in the cuttlebug then covered in glossy accents.
Sewdelish signature

Wednesday, 10 November 2010

Free Business Cards to Download and Print

I know many of you crafters out there are selling at markets and fairs so business cards are a great way to get your name out there. They can be expensive to have made for you and when you only need a few so why not try making them yourself?

I create my own business cards using microsoft publisher, but then I found these sites where you can make your own then save and print off so I wanted to share them with you.

Business Card Star Prints 8 or 10 per page, lots of designs and colours to choose from. Easy and quick to do. Allows you to move text and change colours and even lets you print on the back of the cards if you want to. Here is a sample of what you can do.


Business Card Land A sister site to the above link that also prints 8/10 per page

Free pdf cards Plain cards with a picture or logo you can upload

Sewdelish signature

Friday, 14 May 2010

Chocolate Lace Butterfly Cake

Make Chocolate Lace Buterfly Cake Nutella Icing Swirls

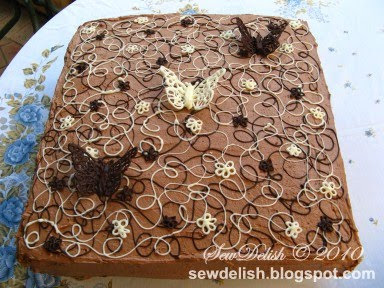
Here is the cake I made for my friend’s 40th birthday recently. You may remember the tri-shutter card I made for her that I posted previously.

The cake is 14” square, weighs over 5 kilos and took me several hours to assemble!

Inside the cake comprises of 1 layer of vanilla sponge topped with 1kg of nutella chocolate spread, 1” thickness of fresh whipped cream followed by another layer of vanilla sponge. That was then covered with lashings of my nutella and chocolate icing and decorated with chocolate lace swirls, chocolate lace flowers and chocolate lace butterflies! The butterflies were the most difficult to make with the wings and body of the butterfly made as one piece. They were very fragile and needed to be supported until the chocolate had set completely.

Make Chocolate Lace Buterfly Cake Nutella Icing Swirls

My friend was speechless when she arrived to pick the cake up. I thought she was going to cry! A number of guests at the party ended up taking heaps of photos of it for her as she didn’t want to cut into it! I would love to hear what you think.

Sewdelish signature

Tuesday, 11 May 2010

Cup Cake Stand Doilies on My Cricut

Cupcake doilies on stand accent essentials cricut expression

It was my friend's birthday recently and I managed to find some time to create.

I cut huge scalloped doilies on my cricut to use on a cupcake stand. There was not enough sections on the stand for all the individual cupcakes(over 50) so I made the doilies to make room for them all.

Cupcake doilies on stand accent essentials cricut expression  chocolate cupcakes

I designed them on the Design Studio software program for the cricut and used the accent essentials cartridge. The doilies have a small hole in the centre for the stand and a slit so they can be removed and replaced without tearing the paper. I needed them to be fairly plain and not too fussy as they were for my friend’s 40th and she does not like pretty girlie things.

I also made the nutella filled chocolate cupcakes to go on the stand. They were bite sized cupcakes only 1" tall and really rich and delicious!
Sewdelish signature

Friday, 2 April 2010

Flowersoft 3D Scenic Summer Window Birthday Card

Flowersoft Birthday Scenic Summer Window Card with Pearls

This is a card I made recently for my Mum's birthday. She loves English gardens so I thought this flowersoft scenic 3d window card would be perfect. I have not seen these around before now so I am presuming they are new releases, not bad to find them here in Australia already.

I really love how the flowersoft looks on this card and I even made a few of my own colour combinations to get the mixes exactly the way I wanted them.

Flowersoft Birthday Scenic summer Window Card with Pearls

I added the sentiment to the inside of the card instead of the front in case Mum decides to frame the card later on.

Flowersoft Birthday Scenic summer Pink Window Card with Pearls

There 4 style windows in each pack with 2 copies of each. They are not die cut but they don't take long to cut by hand. I sat in front of the TV and cut this one out! Then when I had a few minutes here and there I added foam dots and layered them before adding the flowersoft.
Sewdelish signature

Thursday, 1 April 2010

Papermania Honey and Hugs Owl Birthday Card

Papermania Honey and hugs owl birthday card Sewdelish


This was a fun quick card to make. I used the owl from the Honey and Hugs collection designed by Stephanie Dyment. I just love this range and ended up driving to 3 different scrapbook shops in search of it. Thankfully I found a new shop that is more like a crafters cave than shop.

The owl and happy birthday sentiment are adhered to patterned paper using foam dots to add a little dimension. I then added some stickles to the card but unfortunately it is not showing up in the photo.

I originally intended to give this card to my niece who will by turning 13 soon, but I am wondering if it may be a little too cute looking for her. I may just make another card in case I change my mind at the last minute. I would love to hear what you think.
Sewdelish signature

Thursday, 5 November 2009

Christmas Wreath Cards with Cricut and Design Studio

Sewdelish make Cricut Design Studio and Cuttlebug Christmas Pink Card

Here is a Christmas card I made for another card swap. Actually I made 6 the same, but forgot to take a photo of them all together. I really wanted to use a leafy wreath and I didn't have the Joys of the Season Christmas cartridge for my Cricut so I designed one similar using Walk in My Garden and Design Studio. I wanted to also challenge myself not to use Christmas paper or traditional colours to make a card Christmassy.

Once I cut the wreaths I embossed them in my cuttlebug using the textiles embossing folder and then inked them before adding a lace bow. The Merry Christmas cut in gold metallic paper from Wild Card cartridge.

Sewdelish make Cricut Design Studio and Cuttlebug Christmas Pink Card


The lace type card at the base is cut using the Martha Stewart zig zag border punch and the flourish corners are stamped and brushed with pearl-ex.
Sewdelish signature

Twisted Pyramage Card Using One of My Own Photos

SewDelish Twisted Pyramage Card Make using Inscape Tutorial

I made this card recently for our local vet as thanks for her saving Bell, one of our little dogs. I created it using a free program called Inkscape and downloaded a how to tutorial from here. You will need to join this ukscrappers to download the tutorial. This card was my first attempt at using inkscape and making a pyramage card. It took me a little while, but with practice I think I could whip one up in no time.

SewDelish Twisted Pyramage Card Make using Inscape Tutorial

I used a photo of Bell taken a few weeks prior to her surgery where she happened to be chewing on a rock. I used pearl-ex for the thanks and stamped some paw prints on the front and inside the card.

It was Bell's chewing on a stick that got her into trouble where she needed veterinary care and major abdominal surgery. Tinker was lost without her sister until she came home. Thankfully Bell is back to her normal self now chewing on anything small enough to fit in her mouth.
Sewdelish signature

Friday, 28 August 2009

Birthday Card for My 10 Year Old Princess!

Birthday Girl 10 high heel Shoes cricut martha stewart personal impressions stamp

My not so little baby has recently turned 10. To celebrate her entering into the double digits I made her a BIG card, It is 12" high. When I took DD's photo with her big card it was only then we realised her top was almost identical in colour and design! LOL

Birthday Girl 10 high heel Shoes cricut martha stewart personal impressions stamp

The high heel shoes are from a Personal Impressions stamp that was sent to me by the team at Crafts Beautiful. It is actually an iris folding stamp, but I masked out those areas before I stamped it on patterned card. It is heat embossed with black sparkle embossing powder and filled in with holographic silver and turquoise glitter. The shoes are adhered using foam dots.

Birthday Girl 10 high heel Shoes cricut martha stewart personal impressions stamp

The ric rac and ribbon on the side I stitched with the sewing machine and sparkle embroidery thread.
Birthday Girl 10 high heel Shoes cricut martha stewart personal impressions stamp

The number 10 I cut on my cricut expression cutting machine using the storybook cartridge and then glittered all over. I also cut Birthday Girl for the inside and added some bling! I used a Martha Stewart zig zag border punch on patterned card for the lacy effect down the right side of the card.

Birthday Girl 10 high heel Shoes cricut martha stewart personal impressions stamp

I will be looking at fabric and clothing for future ideas for colours and layouts as it was such a big hit! Anyway I would love to hear what you think.
Sewdelish signature

Saturday, 18 July 2009

Making A Chain Maille Bracelet

Make Jewellery Chain Maille Bracelet Jewelery Beads

I have had my eye on this Chain Maille bracelet since the launch of the Make Jewellery magazine online party in April and I have finally finished my version. I have never attempted chain maille jewellery before so I printed out the instructions and they were very easy to follow. If you can open and close jump rings as well as wrap a bead with wire you already have all the skills you need.

Make Jewellery Chain Maille Bracelet Jewelery Beads

I ended up pinning my bracelet to a cushion as I worked so I could see where I was up to as I added the jump rings. I spent 5 minutes here and there until all the rings were joined and then spent a few weeks trying to work out just what beads I wanted on it. LOL One must rush these things after all!

I finally decided on a mixture of glass and shell beads in pink and green pastels. I love how they look with the silver rings. These bracelets would make a beautiful gift and look gorgeous too.
Sewdelish signature

LinkWithin

Related Posts Plugin for WordPress, Blogger...